1. Introduction
In the fast-paced rhythm of modern life, finding a meal that sits at the intersection of “luxurious” and “lightning-fast” can feel like a culinary unicorn. Enter the Healthy Tuna Bowl. This dish isn’t just a meal; it’s a vibrant celebration of freshness, inspired by the traditional Hawaiian Poke but elevated with contemporary nutritional science.
The story of the tuna bowl begins in the Pacific, where fishermen would season the offcuts from their catch for a quick snack. Today, it has evolved into a global phenomenon—the “power bowl.” My first encounter with a truly great tuna bowl was in a small coastal shack in Maui. The simplicity of high-quality fish paired with the crunch of sea salt and the bite of green onions was transformative. This recipe seeks to recreate that magic, focusing on clean energy and explosive flavors that leave you feeling fueled rather than fatigued.
Whether you are looking for a post-workout recovery meal or a sophisticated weekday lunch, this bowl provides a perfect balance of lean protein, healthy fats, and complex carbohydrates.
2. Recipe Overview
- Cuisine Type: Pacific Rim / Fusion
- Difficulty Level: Easy
- Prep Time: 15 minutes
- Cook Time: 5 minutes (for rice/quinoa)
- Total Time: 20 minutes
- Dietary Classifications: Gluten-Free (with Tamari), Dairy-Free, High-Protein, Pescatarian.
3. Equipment and Tools
To achieve the perfect texture and presentation, ensure you have the following tools ready:
- Sharp Chef’s Knife: Essential for clean, non-jagged cuts of raw or seared tuna.
- Large Mixing Bowls: One for the tuna marinade and one for assembling.
- Small Glass Jar: For emulsifying the dressing.
- Rice Cooker or Medium Pot: 2-quart capacity for cooking the base grain.
- Cutting Board: Preferably wood or high-density plastic to protect your knife edge.
- Mandoline Slicer (Optional): For achieving paper-thin radish and cucumber slices.
- Serving Bowls: Wide, shallow bowls (approx. 20–24 oz capacity) are best for showcasing the colorful ingredients.
4. Serving Suggestions
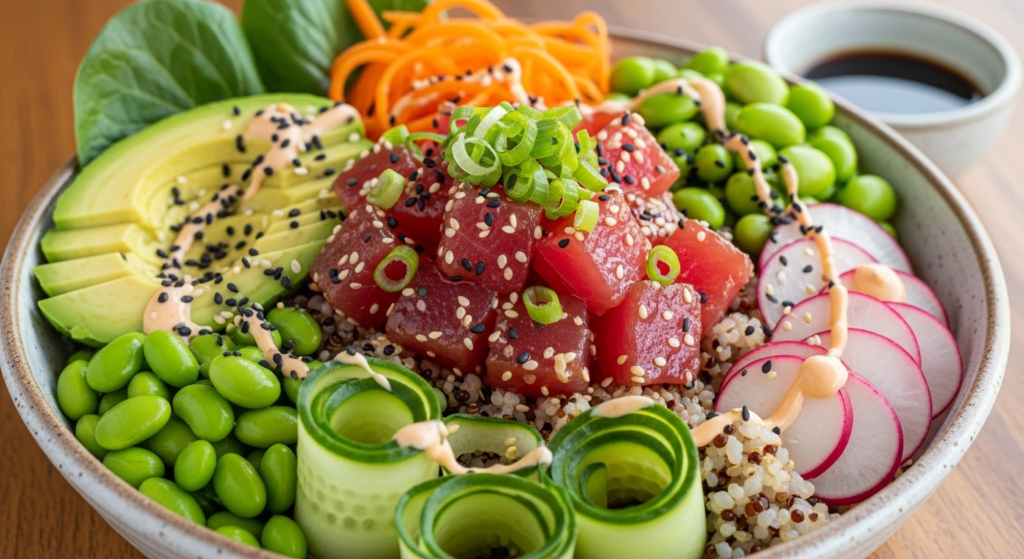
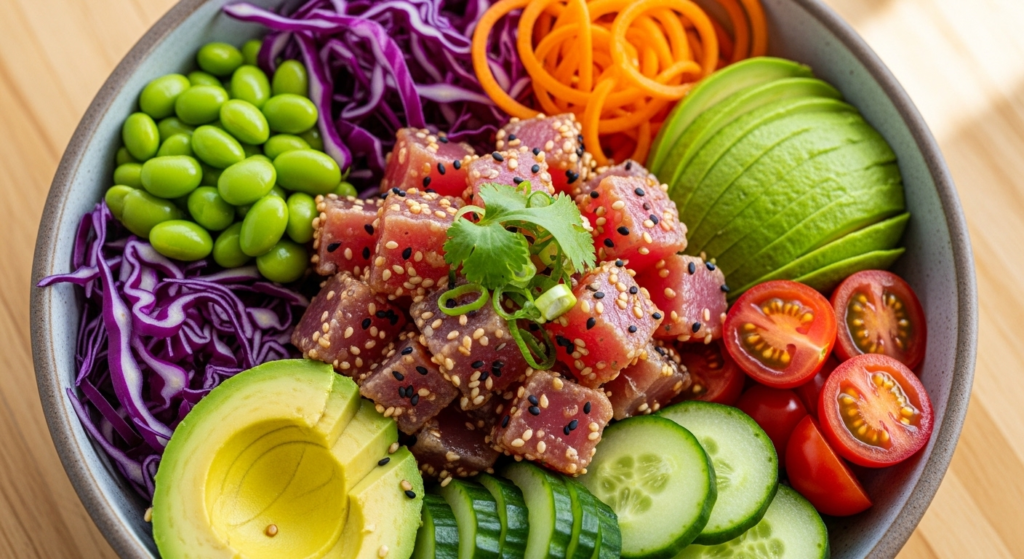
Plating Recommendations: Arrange ingredients in distinct “segments” or “wedges” around the bowl rather than tossing them together. Place the tuna in the center to make it the star of the show.
Garnish Ideas:
- Toasted Nori Strips: For an extra umami punch.
- Microgreens: To add a delicate, peppery finish.
- Black Sesame Seeds: For a striking visual contrast.
Beverage Pairings:
- White Wine: A crisp Grüner Veltliner or a dry Riesling cuts through the richness of the avocado.
- Non-Alcoholic: Iced Green Tea with a squeeze of lime or Sparkling Water with sliced cucumber.
5. Nutritional Information
(Per Serving – based on 4 servings)
Health Benefits: The tuna provides a massive dose of Omega-3 fatty acids, which support heart health and cognitive function. The inclusion of edamame and quinoa ensures a complete amino acid profile, while the avocado provides monounsaturated fats that aid in the absorption of fat-soluble vitamins from the vegetables.
6. Storage and Reheating
- Refrigeration: The vegetable components can be stored in airtight containers for up to 3 days. However, the tuna (if raw/sushi-grade) should be consumed within 24 hours of preparation for optimal safety and flavor.
- Freezing: This dish does not freeze well due to the high water content of the fresh vegetables and the delicate texture of the fish.
- Reheating: This is a cold/room temperature dish. We do not recommend reheating the tuna, as it will drastically change the texture from silky to rubbery. If using rice, you may reheat the grain base slightly before adding the cold toppings.
7. Expert Tips and Variations
Professional Chef Tips
- The “Dry” Secret: Always pat your tuna dry with paper towels before slicing. This prevents the fish from sliding on the board and ensures the marinade sticks to the protein.
- Rice Temperature: Use “sumeshi” (vinegared rice) at room temperature. If the rice is too hot, it will prematurely cook the bottom of your raw tuna.
Creative Variations
- The Keto Bowl: Swap the rice for cauliflower rice or shredded purple cabbage.
- The Seared Version: If you aren’t a fan of raw fish, sear the tuna steak for 45 seconds per side in a smoking hot cast-iron pan, then slice.
- The Spicy Kick: Add a teaspoon of Sriracha or sambal oelek to the marinade.
8. Ingredients Section
The Protein
- 1.5 lbs (680g) Sushi-grade Ahi Tuna (Yellowfin or Bigeye).
- Substitution: Cooked shrimp or smoked salmon.
The Base
- 2 cups (400g) Cooked Brown Rice or Quinoa.
- Substitution: Mixed greens or Zucchini noodles.
The Marinade/Dressing
- 1/4 cup (60ml) Low-sodium Soy Sauce (or Tamari for GF).
- 1 tbsp (15ml) Toasted Sesame Oil.
- 1 tbsp (15ml) Fresh Ginger, grated.
- 1 tsp (5ml) Honey or Maple Syrup.
- 1/2 Lime, juiced.
The Toppings
- 1 large Avocado, sliced.
- 1 cup Edamame, shelled and steamed.
- 1 large English Cucumber, thinly sliced.
- 1/2 cup Carrots, shredded.
- 4 Radishes, thinly sliced.
- 2 Green Onions, scallions sliced on a bias.
9. Step-by-Step Instructions
Step 1: Prepare the Base
Cook your choice of grain (rice or quinoa) according to package instructions. Once cooked, spread it out on a baking sheet to cool to room temperature. Lightly season with a splash of rice vinegar and a pinch of salt.
Step 2: Slice the Tuna
Using a sharp knife, cut the tuna into 1/2-inch (1.25cm) cubes. Consistency is key here; uniform cubes ensure that every bite has the perfect ratio of fish to dressing.
Step 3: Whisk the Marinade
In a small glass jar or bowl, combine the soy sauce, sesame oil, grated ginger, honey, and lime juice. Whisk vigorously until the honey is fully dissolved.
Step 4: Marinate the Fish
Place the tuna cubes in a bowl and pour half of the dressing over them. Toss gently to coat. Let this sit for 5–10 minutes in the refrigerator. Do not marinate longer than 15 minutes, or the acid in the lime juice will begin to “cook” the fish (ceviche-style).
Step 5: Prep the Vegetables
While the tuna marinates, slice your cucumber, radishes, and avocado. Steam the edamame if using frozen.
Step 6: Assemble the Bowl
Distribute the cooled grains into four bowls. Arrange the vegetables in clusters around the edge.
Step 7: The Final Touch
Place the marinated tuna in the center of each bowl. Drizzle the remaining dressing over the vegetables. Garnish with sesame seeds and sliced green onions.
10. Frequently Asked Questions (FAQ)
Q: Where can I find “sushi-grade” tuna? A: Look for reputable fishmongers or high-end grocery stores. “Sushi-grade” isn’t a legal term, but it indicates the fish was frozen to a specific temperature to kill parasites, making it safe for raw consumption.
Q: Can I use canned tuna? A: You can, though the texture will be entirely different. If using canned tuna, mix it with a little Greek yogurt or mayo to create a “tuna salad” style bowl.
Q: Is this recipe spicy? A: As written, it is mild and savory. For heat, add sliced jalapeños or red chili flakes.
Q: Can I make this ahead of time for meal prep? A: Yes! Keep the tuna and the dressing in separate containers. Assemble just before eating to prevent the vegetables from getting soggy.
Q: What if I can’t find edamame? A: Green peas or sliced snap peas make an excellent, crunchy substitute.
Q: Is it okay to use white rice? A: Absolutely. While brown rice adds more fiber, white jasmine or sushi rice provides a classic, silky texture that pairs beautifully with the tuna.