1. Introduction
There is a specific kind of magic that happens when tangy, vinegar-forward hot sauce meets the cooling embrace of ranch or blue cheese. The Buffalo Chicken Wrap isn’t just a convenient lunch; it is a culinary icon born from the gritty, flavorful kitchens of Upstate New York. While the original “Buffalo” style was cemented in history at the Anchor Bar in 1964 via chicken wings, the wrap evolution transformed this messy bar staple into a sophisticated, portable, and textures-rich meal.
The beauty of this dish lies in its contrasts. You have the heat of the cayenne, the crunch of fresh romaine and celery, the creaminess of the dressing, and the hearth of a toasted flour tortilla. It’s a dish that feels equally at home at a high-end bistro as it does at a Sunday football tailgate. In this guide, we aren’t just throwing ingredients into a wrap; we are engineering the perfect bite—balancing moisture, structural integrity, and that unmistakable Buffalo zing.
2. Recipe Overview
- Cuisine Type: American Fusion
- Difficulty Level: Easy to Intermediate
- Prep Time: 15 minutes
- Cook Time: 15 minutes
- Total Time: 30 minutes
- Dietary Classifications: High-protein; can be made Gluten-Free (with tortilla substitution) or Low-Carb (as a lettuce wrap).
3. Equipment and Tools
To achieve professional results, ensure you have the following tools ready:
- Large Non-Stick Skillet or Cast Iron Pan: 12-inch diameter (30 cm) to allow chicken pieces to sear without crowding.
- Mixing Bowls: One large bowl for tossing the chicken in sauce; one medium bowl for the salad component.
- Chef’s Knife: A sharp 8-inch blade for precise dicing of vegetables and chicken.
- Cutting Board: Preferably wooden or high-density plastic.
- Tongs: Stainless steel with silicone tips for flipping chicken and handling hot wraps.
- Whisk: For emulsifying the Buffalo sauce and dressing.
- Measuring Tools: Full set of dry measuring cups and liquid measuring spoons.
- Griddle or Comal: (Optional) For the final “seal” of the wrap to ensure it stays closed and crispy.
4. Serving Suggestions
A Buffalo Chicken Wrap is a powerhouse on its own, but the right accompaniments elevate it to a full dining experience.
Plating & Garnish
Slice the wrap on a sharp bias (diagonal). This not only looks professional but makes it easier to eat. Garnish the plate with a few extra sprigs of fresh cilantro or a side of extra Buffalo sauce for dipping.
Complementary Sides
- Sweet Potato Fries: The sweetness cuts through the acidity of the Buffalo sauce.
- Classic Coleslaw: A vinegar-based slaw provides a refreshing palate cleanser.
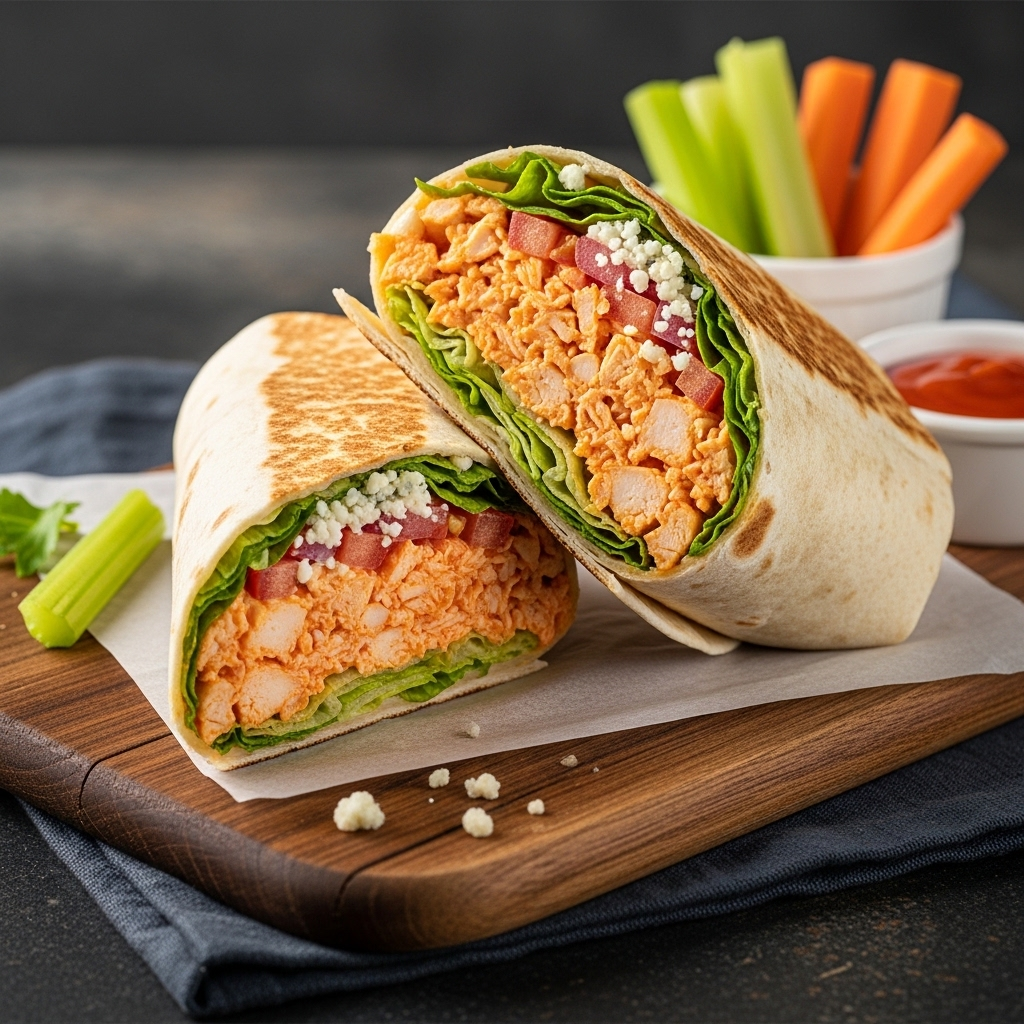
- Celery and Carrot Sticks: A nod to the traditional wing platter.
Beverage Pairings
- Beer: An IPA (India Pale Ale) is the classic choice; the hops stand up to the spice. Alternatively, a crisp Pilsner offers a clean finish.
- Non-Alcoholic: A sparkling lemonade or ginger beer provides a zesty, refreshing counterpoint to the heat.
5. Nutritional Information
(Per serving, based on a standard 10-inch flour tortilla and fried chicken breast)
| Nutrient | Amount | % Daily Value |
|---|---|---|
| Calories | 580 kcal | 29% |
| Total Fat | 28g | 36% |
| Saturated Fat | 9g | 45% |
| Cholesterol | 85mg | 28% |
| Sodium | 1,450mg | 63% |
| Total Carbohydrates | 42g | 15% |
| Protein | 38g | 76% |
Health Benefits: Chicken breast provides a lean, high-quality protein source essential for muscle repair. Adding extra celery and romaine boosts fiber intake and hydration.
6. Storage and Reheating
Storage
- Refrigeration: Store the chicken and vegetables separately if possible. A fully assembled wrap will become soggy within 2–4 hours due to the sauce and dressing soaking into the tortilla.
- Duration: Cooked Buffalo chicken stays fresh in an airtight container for up to 4 days.
Reheating
- The Skillet Method (Recommended): Reheat the chicken in a dry skillet over medium heat until crispy. Warm the tortilla separately for 15 seconds.
- Air Fryer: Place the assembled wrap (if already made) in the air fryer at 350°F (175°C) for 3–5 minutes to regain crispness.
- Avoid the Microwave: Microwaving the entire wrap will result in rubbery chicken and a limp tortilla.
7. Expert Tips and Variations
Professional Secrets
- The “Dry-Wet” Balance: Always toss your chicken in Buffalo sauce just before assembling. This prevents the breading (if using) from getting mushy.
- The Steam Trick: Briefly steam your flour tortillas (wrap them in a damp paper towel and microwave for 20 seconds). This makes them pliable and prevents tearing during the rolling process.
Common Mistakes
- Overstuffing: It’s tempting to pack the wrap, but leaving 2 inches of space at the edges is crucial for a tight seal.
- Cold Chicken: Unless you are making a deliberate “Cold Buffalo Salad Wrap,” ensure the chicken is hot and the veggies are cold for that temperature-contrast sensation.
Variations
- The “Health-Nut”: Use grilled chicken strips instead of fried, and swap the flour tortilla for a large collard green leaf.
- The “Blue-Buffalo”: Swap ranch for a high-quality gorgonzola dressing and add extra blue cheese crumbles inside.

8. Ingredients Section
The Chicken
- 1 lb (450g) Boneless, skinless chicken breast or thighs.
- 1 cup (125g) All-purpose flour (for dredging).
- 1 tsp (5g) Smoked paprika, garlic powder, and onion powder.
The Buffalo Sauce
- 1/2 cup (120ml) Frank’s RedHot or similar cayenne-based sauce.
- 1/4 cup (55g) Unsalted butter, melted.
- 1 tbsp (15ml) White vinegar or lemon juice.
The Wrap & Fillings
- 4 Large (10-inch) Flour tortillas.
- 2 cups Chopped Romaine lettuce.
- 1/2 cup Diced celery (essential for the authentic “Buffalo” crunch).
- 1/2 cup Shredded carrots.
- 1/4 cup Red onion, thinly sliced.
- 1/2 cup Blue cheese or Ranch dressing.
9. Step-by-Step Instructions
Step 1: Prepare the Chicken
Cut the chicken into bite-sized 1-inch cubes. In a bowl, mix the flour with paprika, garlic powder, salt, and pepper. Dredge the chicken pieces until fully coated.
- Technique: Shake off excess flour to ensure the coating doesn’t become pasty in the pan.
Step 2: Searing for Success
Heat 2 tablespoons of oil in your skillet over medium-high heat. Add the chicken in a single layer. Cook for 5–7 minutes, turning occasionally, until the internal temperature reaches 165°F (74°C) and the exterior is golden brown.
Step 3: The Buffalo Glaze
In a large bowl, whisk together the hot sauce, melted butter, and vinegar. Once the chicken is done, transfer it directly from the pan into the bowl. Toss vigorously until every piece is glowing orange.
Step 4: Tortilla Preparation
Warm the tortillas on a dry pan for 15 seconds per side. This activates the gluten, making them stretchy and less likely to rip.
Step 5: The Assembly
Lay the tortilla flat. In the center, spread a tablespoon of dressing. Layer a handful of romaine, celery, carrots, and onions. Top with a generous portion of the Buffalo chicken.
Step 6: The Professional Fold
Fold the left and right sides of the tortilla inward toward the center. While holding them, use your thumbs to lift the bottom edge over the fillings. Pull back slightly to tighten the roll, then roll forward until sealed.
Step 7: The Final Sear
Place the wrap seam-side down on a hot skillet for 30 seconds. This “glues” the wrap shut and adds a delightful crunch to the exterior.
10. Frequently Asked Questions (FAQ)
Q: Can I use pre-cooked rotisserie chicken? A: Absolutely! It’s a great time-saver. Simply shred the chicken and toss it with the Buffalo sauce in a warm pan to heat through before assembly.
Q: How do I keep the wrap from falling apart? A: The “Final Sear” (Step 7) is the secret. Also, avoid putting too much dressing directly against the tortilla; use the lettuce as a barrier.
Q: Is Buffalo sauce the same as hot sauce? A: Not quite. Hot sauce is usually just peppers, vinegar, and salt. Buffalo sauce adds butter (or a butter substitute) to create a rich, mellow, and clingy consistency.
Q: What’s the best way to make this gluten-free? A: Use a certified gluten-free flour for the chicken dredge (or skip the dredge) and use a large almond-flour or cassava-flour tortilla.
Q: Can I make this in an Air Fryer? A: Yes! You can “fry” the breaded chicken in the air fryer at 400°F for 10-12 minutes for a healthier version with less oil.


