1. Introduction: A Sip of Liquid Sunshine
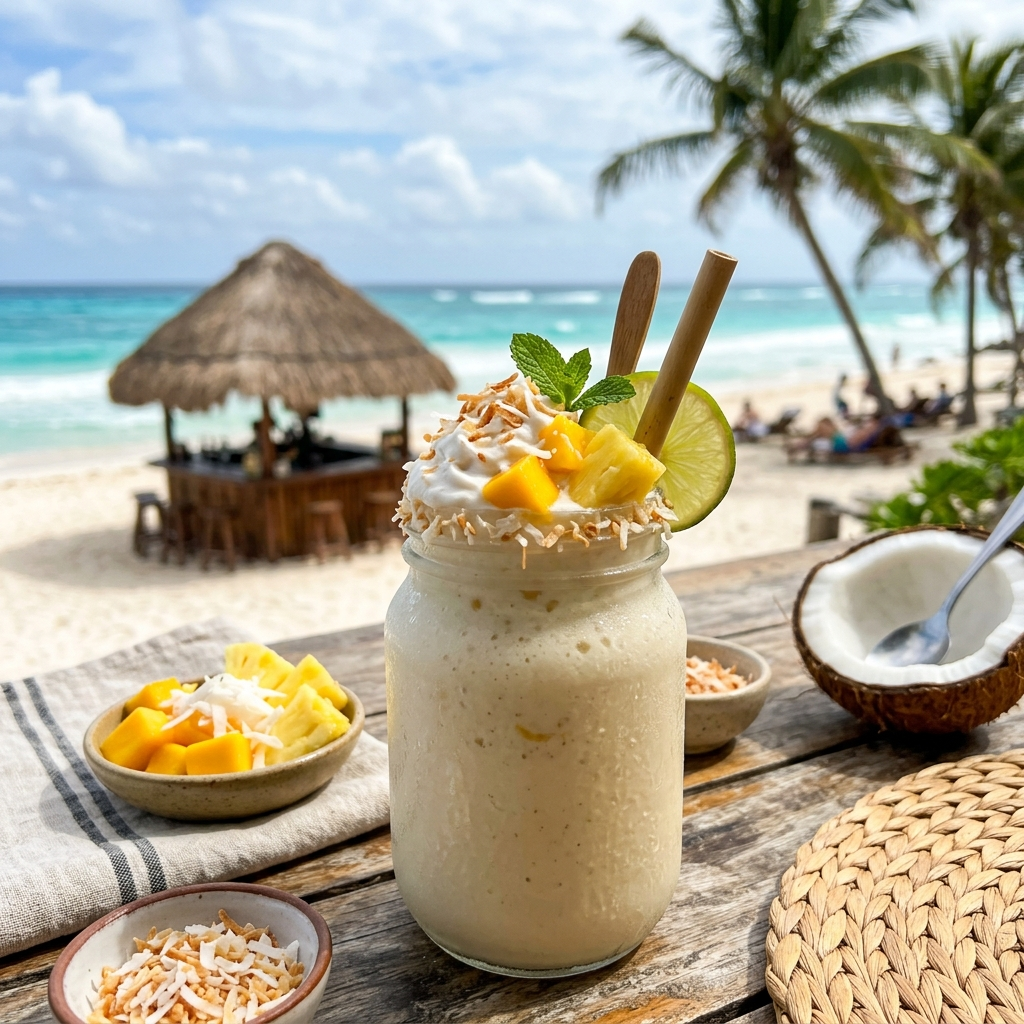
Imagine standing on a white-sand beach, the salt air misting your face, and a chilled drink in your hand that tastes exactly like a vacation. That is the essence of the Ice Tropical Coconut Cream Smoothie.
This isn’t just another fruit shake; it is a masterclass in texture and tropical synergy. Historically, coconut-based beverages have been staples in Southeast Asian and Caribbean cultures for centuries, prized for their hydrating properties and rich, healthy fats. This specific recipe draws inspiration from the “Colada” family but strips away the artificial syrups and heavy sugars in favor of whole, vibrant ingredients.
The significance of this smoothie lies in its versatility. It serves as a functional breakfast, a post-workout recovery powerhouse, or a sophisticated non-alcoholic treat for a summer soirée. By marrying the velvety fat of coconut cream with the acidic brightness of pineapple and mango, we create a flavor profile that is both indulgent and refreshing. It’s a nostalgic nod to classic tropical flavors, re-engineered for the modern, health-conscious palate.
2. Recipe Overview
- Cuisine Type: Tropical / Fusion
- Difficulty Level: Easy (Beginner-friendly)
- Total Preparation Time: 5–8 minutes
- Cooking Time: 0 minutes (No-cook recipe)
- Dietary Classifications: Vegan, Vegetarian, Gluten-Free, Dairy-Free, Paleo-friendly, Refined Sugar-Free.
3. Equipment and Tools
To achieve the “velvet” texture that defines a professional-grade smoothie, the right tools are essential.
Essential Hardware
- High-Speed Blender: A blender with at least 1,200 watts of power (e.g., Vitamix or Ninja) is recommended to pulverize frozen fruit fibers and ice into a seamless liquid.
- Volume Measurements: * Standard US Cup set (1 cup, 1/2 cup, 1/4 cup).
- Tablespoon and Teaspoon set.
- Glassware: Highball glasses or 16 oz Mason jars are ideal.
- Long-Handled Spoon: For scraping down the sides of the blender jar if needed.
Specifications
- Blender Jar Volume: Minimum 32 oz capacity to allow for aeration.
- Storage Containers: If prepping in advance, use airtight glass jars with a depth of at least 6 inches to prevent oxidation at the surface.
4. Serving Suggestions
Plating Recommendations
Pour the smoothie slowly into a chilled glass to maintain its thick consistency. For a “gourmet” look, drizzle a teaspoon of coconut cream around the inside of the glass before pouring to create a marbled effect.
Garnish Ideas
- Toasted Coconut Shavings: Adds a necessary crunch and reinforces the nutty aroma.
- Fresh Mint Sprig: The herbal note cuts through the richness of the cream.
- Dehydrated Pineapple Ring: A sophisticated, chewy garnish.
- Macadamia Nut Dust: Finely grated nuts add a buttery finish.
Pairings
- Side Dishes: Serve alongside a light quinoa salad or a plate of fresh papaya with lime.
- Beverage Pairings: If serving at a brunch, pair with chilled hibiscus tea or a light sparkling mineral water.
5. Nutritional Information
Note: Values are approximate per 16 oz serving.
| Nutrient | Amount |
| Calories | 310 kcal |
| Total Fat | 18g |
| Saturated Fat | 14g (Medium-Chain Triglycerides) |
| Carbohydrates | 36g |
| Fiber | 5g |
| Protein | 3g |
| Vitamin C | 85% DV |
Health Benefits
The Medium-Chain Triglycerides (MCTs) found in coconut cream are rapidly absorbed by the liver and used for immediate energy rather than being stored as fat. Additionally, the high Vitamin C content from the mango and pineapple supports collagen production and immune health.
6. Storage and Reheating
Refrigeration
This smoothie is best enjoyed immediately. However, you can store it in an airtight jar in the fridge for up to 12 hours.
- Pro Tip: Separation is natural. Shake vigorously or give it a quick 10-second pulse in the blender before drinking.
Freezing
You can freeze the mixture into silicone ice cube trays. When ready to consume, pop the cubes into a blender with a splash of coconut water and blend. This is perfect for meal prepping.
Reheating
Not applicable. Never microwave or heat a smoothie, as it destroys the delicate enzymes and alters the flavor of the fresh fruit.
7. Expert Tips and Variations
Professional Chef Tips
- The “Chill” Factor: Always use frozen fruit instead of fresh fruit plus ice. This prevents the smoothie from becoming “watered down” as the ice melts.
- Order of Operations: Always add your liquids first, followed by powders/creams, and then the frozen solids. This creates a vortex that protects your blender blades.
Common Mistakes to Avoid
- Using “Light” Coconut Milk: This will result in a thin, watery consistency. Stick to full-fat coconut cream for that signature mouthfeel.
- Over-blending: Blending for too long generates heat, which can start to “cook” the enzymes in the fruit and dull the bright flavors.
Creative Variations
- The “Green” Paradise: Add 1 cup of baby spinach. The coconut and pineapple completely mask the flavor, making it a great way to sneak in greens.
- Protein Boost: Add one scoop of vanilla pea protein or collagen peptides.
- The Zesty Kick: Add 1/2 inch of fresh peeled ginger for an anti-inflammatory zing.
8. Ingredients Section
The Foundation
- 1 cup (240ml) Full-Fat Coconut Cream: Sourced from a BPA-free can (refrigerate the can overnight and use the thick white part at the top).
- 1.5 cups (225g) Frozen Mango Chunks: Provides the “creamy” base.
- 1/2 cup (75g) Frozen Pineapple: Adds necessary acidity.
The Enhancers
- 1/2 cup (120ml) Unsweetened Coconut Water: For hydration and electrolyte balance.
- 1 tbsp Fresh Lime Juice: Brightens the tropical notes.
- 1/2 tsp Pure Vanilla Bean Paste: Adds a floral depth.
- Optional: 1 tsp Raw Honey or Maple Syrup (if your fruit isn’t at peak ripeness).
Substitutions
- Coconut Water $\rightarrow$ Nut Milk: Use almond or cashew milk for a more “nutty” flavor.
- Mango $\rightarrow$ Frozen Banana: Provides similar creaminess but changes the flavor profile significantly.
9. Step-by-Step Instructions
- Prep the Liquid Base: Pour the coconut water and lime juice into the blender. Adding liquids first ensures a smooth start and prevents the blades from getting stuck.
- Add the Cream: Spoon in the chilled coconut cream and vanilla paste.
- Incorporate the Frozen Solids: Add the frozen mango and pineapple chunks. If you prefer an extra-cold “slushie” texture, add 1/2 cup of crushed ice now.
- The Low-Pulse Start: Start the blender on its lowest speed setting. Pulse 3–5 times to break down the large frozen chunks.
- The High-Speed Whirl: Increase the speed to high and blend for 45 to 60 seconds.
- Check for Consistency: Stop the blender. Lift the lid and check the texture. It should be thick enough to hold a soft peak but thin enough to sip through a wide straw.
- Final Adjustment: Taste a small amount. If it’s too tart, add your sweetener of choice and pulse for 5 more seconds.
- Serve: Pour immediately into chilled glasses and garnish as desired.
10. Frequently Asked Questions (FAQ)
Q: Can I use shredded coconut inside the smoothie?
A: Yes, but be aware it will add a “chewy” texture. If you want a smooth drink, it’s better to use shredded coconut as a topping only.
Q: Why is my smoothie too thick to blend?
A: This usually happens if you have too much frozen fruit. Add coconut water 1 tablespoon at a time through the lid cap while the blender is running until the vortex forms.
Q: Is coconut cream healthy?
A: Yes, in moderation. It is high in saturated fats, specifically MCTs, which are used differently by the body than animal-based fats. It is a great source of energy for those on plant-based or keto-leaning diets.
Q: Can I use fresh fruit instead of frozen?
A: You can, but the smoothie will be thin and lukewarm. If using fresh fruit, you must add at least 1.5 cups of ice to achieve the correct “Ice Tropical” consistency.
Q: How do I get the coconut cream out of the can easily?
A: Don’t shake the can! Open it carefully, and the cream will have naturally separated to the top. Scoop it out with a spoon, leaving the watery liquid (which you can use as your coconut water base) at the bottom.


