1. Introduction
The humble tuna sandwich has long been the unsung hero of the weekday lunch. Reliable, quick, and nostalgic, it’s the meal we turn to when time is short but hunger is high. However, the “Ultimate Spicy Tuna Sandwich” isn’t just a pantry staple—it’s a culinary glow-up. By marrying the convenience of canned tuna with the sophisticated heat of Japanese-inspired aromatics, we transform a simple deli favorite into a cafe-quality masterpiece.
This recipe draws inspiration from the “Spicy Tuna Roll” found in sushi bars across the globe, bridging the gap between East and West. We’ve swapped the seaweed and rice for crusty, artisanal bread and added layers of texture that make every bite an experience. Whether you’re looking to break the monotony of your meal prep or need a high-protein dinner that feels indulgent, this sandwich delivers a punch of flavor that lingers long after the last crumb is gone.
2. Recipe Overview
- Cuisine Type: Modern American / Fusion
- Difficulty Level: Easy
- Prep Time: 15 minutes
- Cook Time: 5 minutes (toasting)
- Total Time: 20 minutes
- Dietary Classifications: Pescatarian, High-Protein (Gluten-Free option available with bread substitute)
3. Equipment and Tools
To achieve the perfect balance of a creamy interior and a crunchy exterior, having the right tools is essential.
- Mixing Bowl: Medium-sized (approx. 1.5 to 2 liters) to allow for vigorous mixing without spills.
- Fine-Mesh Strainer: Essential for draining the tuna thoroughly to avoid a soggy sandwich.
- Chef’s Knife & Cutting Board: For precision dicing of celery, onions, and herbs.
- Cast Iron Skillet or Griddle: Recommended for achieving an even, golden-brown toast on the bread.
- Silicone Spatula: For folding ingredients together gently.
- Measuring Spoons and Cups: Standard US Imperial or Metric sets.
- Bread Knife: Serrated edge for slicing through crusty loaves without crushing the airy interior.
4. Serving Suggestions
Plating Recommendations
Serve the sandwich sliced diagonally to showcase the vibrant layers. Use a matte ceramic plate to make the colors of the greens and the golden bread pop.
Garnish Ideas
- Microgreens: A handful of radish or pea shoots adds a peppery finish.
- Pickled Red Onions: Provides a bright pink contrast and an acid hit.
- Black Sesame Seeds: A nod to its sushi-inspired roots.
Side Dishes
- Kettle-Cooked Chips: The classic crunch of sea salt or salt-and-vinegar chips.
- Cucumber Salad: A light, rice-vinegar-based slaw to cool down the palate.
- Sweet Potato Fries: The sweetness balances the sriracha heat perfectly.
Beverage Pairings
- Wine: A crisp, chilled Sauvignon Blanc or a dry Rosé.
- Beer: A citrusy IPA or a light Japanese Lager.
- Non-Alcoholic: Sparkling water with a squeeze of lime or an iced Hibiscus tea.
5. Nutritional Information
(Per Serving – based on 2 large sandwiches)
| Nutrient | Amount per Serving |
| Calories | 480 kcal |
| Total Fat | 18g |
| Saturated Fat | 3g |
| Cholesterol | 45mg |
| Sodium | 820mg |
| Total Carbohydrates | 42g |
| Dietary Fiber | 4g |
| Sugars | 5g |
| Protein | 36g |
Health Benefits: High in Omega-3 fatty acids for heart health and packed with lean protein to keep you satiated.
6. Storage and Reheating
- Refrigeration: The spicy tuna salad mixture can be stored in an airtight container for up to 3 days. Store the bread and toppings separately.
- Freezing: It is not recommended to freeze tuna salad, as the mayonnaise and celery will lose their texture and separate upon thawing.
- Reheating: This sandwich is best enjoyed fresh. If you must reheat a pre-made sandwich, use an air fryer at 350°F (175°C) for 3 minutes to recrisp the bread. Avoid the microwave, which will turn the bread rubbery.
7. Expert Tips and Variations
Professional Chef Tips
- The “Dry” Rule: The secret to a non-soggy sandwich is draining the tuna until it’s nearly bone-dry before adding the mayo.
- Temperature Contrast: Use cold tuna salad against hot, freshly toasted bread for a professional sensory experience.
- The Fat Barrier: Spread a thin layer of butter or mayo on the inside of the bread slices before adding the tuna to act as a moisture barrier.
Creative Variations
- The “Tuna Melt” Edition: Add a slice of sharp white cheddar or pepper jack and broil until bubbly.
- The Avocado Smash: Replace half the mayo with mashed avocado for a creamier, healthier fat profile.
- Mediterranean Style: Swap sriracha for harissa and add chopped kalamata olives.
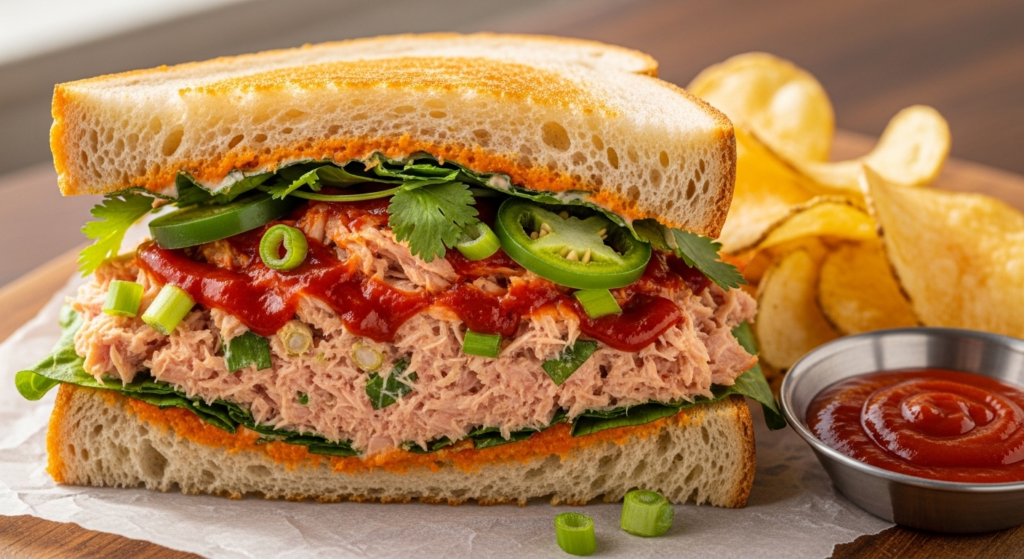
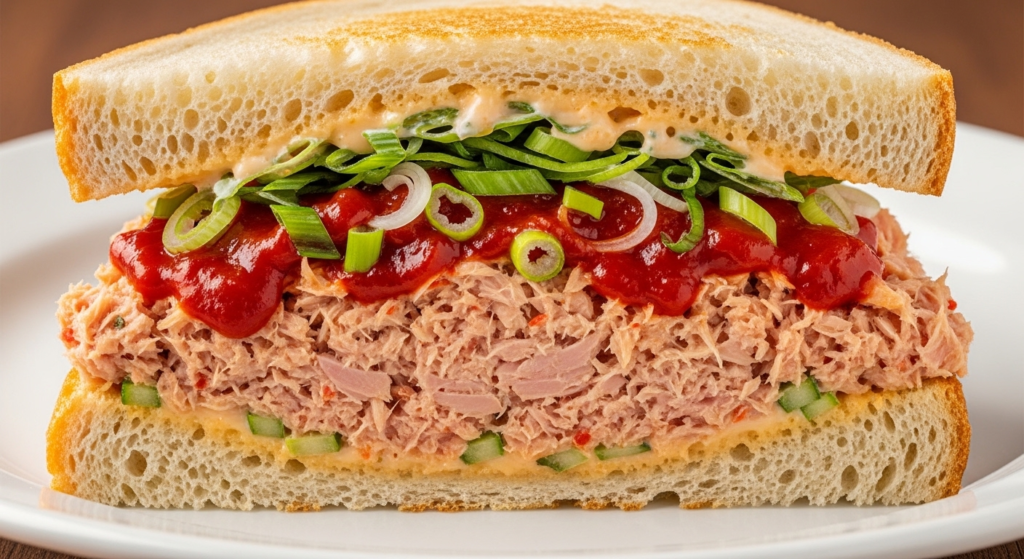
8. Ingredients Section
The Tuna Base
- Tuna: 2 cans (5 oz / 142g each) of solid white albacore in water, drained.
- Mayonnaise: 1/4 cup (60ml) Japanese Kewpie mayo (preferred for richness) or standard high-quality mayo.
- Sriracha: 1-2 tbsp (15-30ml) depending on heat preference.
- Toasted Sesame Oil: 1 tsp (5ml) for an earthy aroma.
The Crunch & Flavor
- Celery: 1 stalk, finely minced.
- Red Onion: 2 tbsp, finely diced (soak in cold water for 5 mins to remove “bite”).
- Pickled Jalapeños: 1 tbsp, chopped.
- Fresh Cilantro: 2 tbsp, chopped.
- Lime Juice: 1 tsp, freshly squeezed.
The Bread & Assembly
- Bread: 4 thick slices of Sourdough or Ciabatta.
- Butter: 1 tbsp, softened (for toasting).
- Greens: Arugula or butter lettuce.
- Tomato: 2 thick slices of beefsteak tomato.
9. Step-by-Step Instructions
Step 1: Prep the Tuna
Open the cans and use the lid or a fine-mesh strainer to press out every drop of liquid. Transfer the tuna to your mixing bowl and flake it thoroughly with a fork until no large chunks remain.
Step 2: Build the Flavor Base
Add the mayonnaise, sriracha, sesame oil, and lime juice to the tuna. Mix until the tuna is fully coated. The mixture should be creamy but hold its shape.
Step 3: Add the Texture
Fold in the minced celery, red onion, pickled jalapeños, and cilantro. Season with a pinch of sea salt and freshly cracked black pepper. Taste and adjust heat: Add more sriracha if you want it fiery.
Step 4: Toast the Bread
Heat your skillet over medium heat. Lightly butter one side of each bread slice. Place in the skillet, butter-side down, and toast for 2-3 minutes until golden brown and “ringing” (makes a sound when scratched with a fork).
Step 5: The Assembly
- Place two slices of bread on your board, toasted side down (or toasted side out if you prefer both sides toasted).
- Layer a generous handful of arugula on the bottom.
- Top with a thick slice of tomato.
- Scoop a large mound of the spicy tuna mixture onto the tomato and spread to the edges.
- Close the sandwich with the remaining bread slice.
10. Frequently Asked Questions (FAQ)
Q: Can I use tuna in oil?
A: Yes, but ensure you drain it exceptionally well. Tuna in oil provides a richer flavor but can make the sandwich significantly heavier.
Q: How do I make this less spicy?
A: Reduce sriracha to 1 teaspoon and swap pickled jalapeños for sweet pickles or diced cucumber.
Q: What bread is best for a tuna sandwich?
A: Sourdough is king because its structural integrity holds up against the moisture of the tuna. For a softer bite, try a brioche bun.
Q: Is Kewpie mayo necessary?
A: Not necessary, but highly recommended. It uses only egg yolks and MSG, giving it a deeper umami flavor that pairs perfectly with spicy elements.
Q: Can I make this ahead of time for work?
A: Absolutely. Keep the tuna salad in a small container and the bread/veggies separate. Assemble just before eating to ensure the bread stays crisp.


