Table of Contents
There’s something truly special about a dessert that looks impressive but takes minimal effort to create. If you’ve been searching for that perfect sweet ending to a meal or a delightful treat for a gathering, look no further than these no-bake cheesecake cups. These individual cheesecake cups are a fantastic way to enjoy the classic creamy dessert without turning on your oven. They are simple to assemble and pack a big flavor punch.
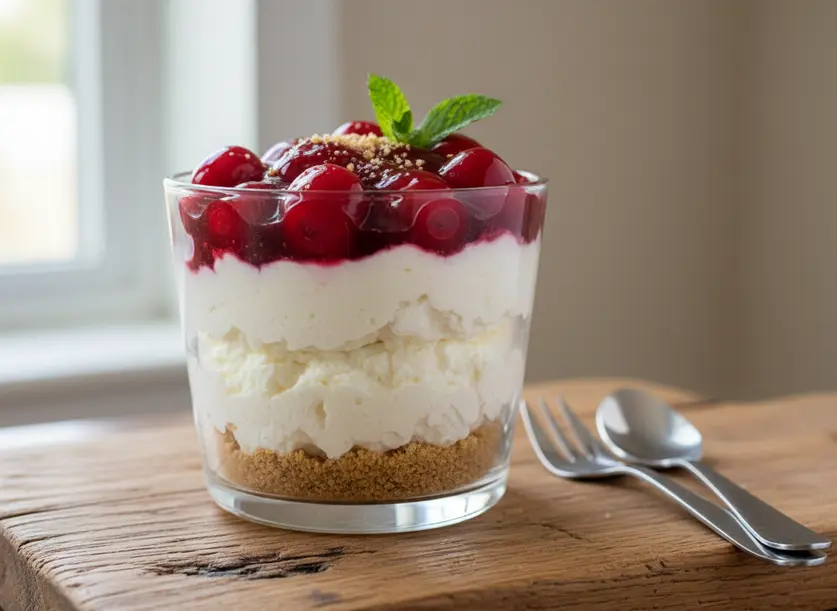
Imagine layers of buttery graham cracker crust, a rich, tangy cream cheese filling, and a bright, fruity topping all served in cute, individual portions. These cheesecake cups are not just easy; they’re incredibly versatile and a guaranteed crowd-pleaser. You’ll love how quickly you can whip them up, making them perfect for last-minute entertaining or a spontaneous sweet craving. Let’s get started on creating your new favorite dessert!
What Makes This Dish Worth Making
These no-bake cheesecake cups are a game-changer for anyone who loves dessert but dislikes fuss. First and foremost, the “no-bake” aspect is a huge win. You won’t need to worry about water baths, cracked tops, or uneven baking. Simply mix, layer, and chill – it’s that easy. This also means you don’t heat up your kitchen, which is ideal during warmer months or when you’re preparing a big meal.
Another fantastic benefit is their individual serving size. No cutting, no messy slices, and everyone gets their own perfectly portioned treat. This makes them ideal for parties, potlucks, or even just keeping a stash in the fridge for personal enjoyment. The clear cups also show off those beautiful layers, making them visually appealing and adding to the dessert experience. Plus, you can easily customize each cup with different toppings or crusts, catering to various tastes.
These cheesecake cups offer that classic cheesecake flavor and texture we all adore – creamy, rich, and a little tangy – but in a fraction of the time and with much less stress than a traditional baked cheesecake. They are also incredibly versatile, allowing you to swap out fruit fillings or crust flavors to suit your preferences or the season. They truly combine convenience, deliciousness, and customizable fun into one simple dessert.
Ingredients You Will Need
Gathering your ingredients for these delicious cheesecake cups is straightforward. For the crust, we’ll start with nine sheets of graham crackers. If you prefer, you can easily swap these for crushed Oreos, Nilla Wafers, or even gingersnap cookies for a different flavor profile. You’ll also need a quarter cup of granulated sugar and three tablespoons of melted butter to bind those crumbs together into a perfect base.
Moving on to the creamy filling, you’ll need one 8-ounce block of cream cheese, ensuring it’s softened to room temperature for a lump-free mixture. If you’re short on time, you can also use whipped cream cheese from a tub. A 14-ounce can of sweetened condensed milk will provide the perfect amount of sweetness and creamy texture, making the filling wonderfully rich. To balance that richness and add a delightful tang, you’ll use a quarter cup of fresh lemon juice, which comes from about half of a medium lemon. Finally, to crown your creation, grab a 21-ounce can of cherry pie filling. This store-bought shortcut makes these cups incredibly quick to assemble, but feel free to use your favorite homemade fruit topping if you have one on hand.

How to Make It Step by Step
Creating these simple no-bake cheesecake cups is a breeze. Just follow these easy steps:
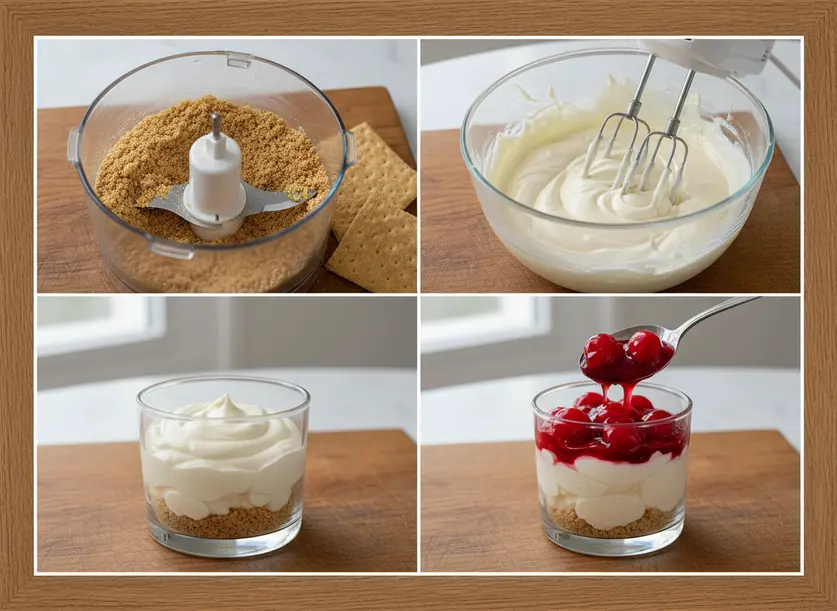
- Prepare the Crust: In the bowl of a food processor, combine the graham cracker sheets, granulated sugar, and melted butter. Pulse these ingredients until the mixture resembles wet sand. If you don’t have a food processor, place the graham crackers in a Ziploc bag and crush them with a rolling pin, then stir in the sugar and butter in a bowl.
- Make the Filling: In a large mixing bowl, combine the softened cream cheese, sweetened condensed milk, and fresh lemon juice. Use an electric mixer to beat these ingredients together until the mixture is completely smooth and creamy, with no lumps remaining.
- Layer the Cups: Grab your individual serving cups of choice. Begin by placing a layer of the graham cracker crumbs at the bottom of each cup. You’ll want a sturdy base for your cheesecake.
- Add Cheesecake Layer: Next, spoon a generous layer of the creamy cheesecake mixture over the graham cracker crumbs in each cup. Spread it gently to create an even layer.
- Top with Fruit: Spoon a layer of the cherry pie filling over the cheesecake mixture. Distribute it evenly among the cups.
- Repeat Layers: For extra decadence and visual appeal, repeat the layering process one more time. Add another layer of graham cracker crumbs, followed by more cheesecake mixture, and then another layer of cherry pie filling.
- Final Crumb Topping: Finish off each cup with a sprinkle of any remaining graham cracker crumbs on top for a little extra texture and crunch.
- Chill and Enjoy: Refrigerate the assembled cheesecake cups for at least 1 hour. This allows the layers to set and the flavors to meld beautifully. Once chilled, they are ready to be enjoyed!
Tips for the Best Results
Achieving perfect cheesecake cups every time is easy with a few simple tricks. First, always make sure your cream cheese is properly softened to room temperature. This is crucial for a smooth, lump-free filling. Cold cream cheese will result in a clumpy texture that’s hard to mix. If you forget to set it out, you can microwave the unwrapped block on low power for 10-15 seconds at a time until it’s just soft.
When preparing the crust, a food processor is your best friend for quickly getting fine, even crumbs. However, if you don’t have one, placing the graham crackers in a sturdy freezer bag and crushing them with a rolling pin works perfectly. Just make sure the crumbs are fine enough to pack down well. If your crust seems too dry, add a tiny bit more melted butter, a teaspoon at a time, until it holds together when pressed.
An electric mixer, whether handheld or stand, is highly recommended for the cheesecake filling. It whips air into the mixture, making it incredibly light and fluffy, giving your cheesecake cups that signature creamy consistency. Don’t overmix, though; just mix until smooth and combined. For presentation, using clear cups really showcases the beautiful layers of crust, filling, and fruit, making them even more appealing.
For storage, any leftover cheesecake cups should be covered with plastic wrap or stored in an airtight container in the refrigerator. They will stay fresh and delicious for up to 5 days, making them a fantastic make-ahead dessert. Covering them helps prevent the top from forming a slight “crust” due to air exposure. If your filling seems too soft after chilling, it might need a bit more time in the fridge. Sometimes a slightly colder fridge or a longer chill time (2-3 hours) can make a big difference, especially if your cream cheese was very soft to begin with.
Variations to Try
The beauty of these cheesecake cups lies in their adaptability. While cherry is a classic choice, don’t hesitate to experiment with other fruit toppings. Strawberry pie filling is another popular option, offering a sweet and slightly tart flavor that pairs wonderfully with the creamy cheesecake. Blueberry or mixed berry pie fillings also work beautifully, providing a different color and taste dimension. For a lighter touch, you could use fresh berries tossed with a little sugar and lemon juice, just be sure to add them right before serving to prevent sogginess.
Beyond the fruit, you can play with the crust. We already mentioned Oreos for a chocolatey twist or Nilla wafers for a more vanilla-centric flavor. You could also try crushed shortbread cookies or even pretzels for a salty-sweet combination. Adding a teaspoon of vanilla extract or almond extract to the cheesecake filling can enhance its flavor even further. A pinch of cinnamon in the graham cracker crust also adds a warm, inviting note.
Consider different toppings for extra flair. A dollop of whipped cream, a sprinkle of chocolate shavings, a drizzle of caramel sauce, or some toasted coconut flakes can elevate your cheesecake cups. You could even make a lemon curd filling instead of fruit for a super zesty treat. The possibilities are truly endless, allowing you to customize these simple desserts for any occasion or personal preference.
FAQ
Can I make these cheesecake cups ahead of time?
Absolutely! These cheesecake cups are an excellent make-ahead dessert. You can assemble them up to 3 to 5 days in advance. Just make sure to cover them tightly with plastic wrap or store them in an airtight container in the refrigerator to maintain their freshness and prevent them from absorbing fridge odors.
How do I prevent my cheesecake cups from being too soft?
To ensure your cheesecake cups set perfectly, make sure your cream cheese is softened but not warm, and that you’re using the correct proportions of sweetened condensed milk and lemon juice. The lemon juice helps to firm up the cream cheese. Most importantly, give them adequate chilling time – at least 1 hour, but 2 to 3 hours or even overnight often yields the best, firmest results.
What if I don’t have a food processor?
No food processor? No problem! You can easily crush the graham crackers by placing them in a large, sturdy resealable bag and using a rolling pin, the bottom of a heavy glass, or a meat mallet to break them into fine crumbs. Alternatively, you can often find pre-crushed graham cracker crumbs in the baking aisle of most grocery stores, which saves even more time and effort.


