1. Introduction
There is a specific kind of magic that happens when the nostalgic, cocoa-heavy crunch of an Oreo meets the creamy, tropical whisper of coconut. The Oreo Coconut Frost Blast isn’t just a dessert; it’s a sensory experience designed to bridge the gap between a classic American snack and a sophisticated island getaway.
The origin of this dish lies in the “icebox cake” tradition—a staple of mid-century home cooking that prioritized convenience without sacrificing indulgence. However, the “Frost Blast” evolution takes it a step further. By incorporating coconut milk and toasted flakes, we elevate the profile from a simple kid’s treat to a textured, layered masterpiece. Whether you are hosting a summer soirée or simply looking for a weekend project that doesn’t require turning on the oven, this recipe offers a refreshing reprieve from the mundane.
2. Recipe Overview
- Cuisine Type: American-Fusion / Modern No-Bake
- Difficulty Level: Intermediate (Requires patience for layering and chilling)
- Total Time: 4 hours 20 minutes
- Prep Time: 20 minutes
- Chilling Time: 4 hours
- Dietary Classifications: Vegetarian (Can be adapted to Vegan/Dairy-Free)
3. Equipment and Tools
To achieve the professional “Blast” aesthetic—perfectly clean layers and a structural integrity that stands tall when sliced—the right tools are non-negotiable.
Core Kitchen Tools
- High-Speed Blender or Food Processor: Essential for pulsing the Oreos into a fine sand-like consistency for the base.
- Stand Mixer or Electric Hand Mixer: To aerate the coconut cream and heavy cream into stiff peaks.
- Springform Pan: A 9-inch (23 cm) diameter pan is highly recommended.
- Offset Spatula: For smoothing the frost layers to a mirror finish.
Specific Specifications
- Pan Depth: Ensure your pan has a minimum depth of 3 inches (7.5 cm) to accommodate the multiple layers.
- Volume: The total volume of the mixture is approximately 2.5 Liters.
- Parchment Paper: Essential for lining the bottom to ensure easy removal from the springform base.
4. Serving Suggestions
Plating Recommendations
For a “restaurant-style” presentation, chill your dessert plates for 10 minutes before serving. Slice the Frost Blast using a knife dipped in hot water and wiped dry between every single cut. This ensures the white coconut layers remain pristine against the dark Oreo crumbs.
Garnish Ideas
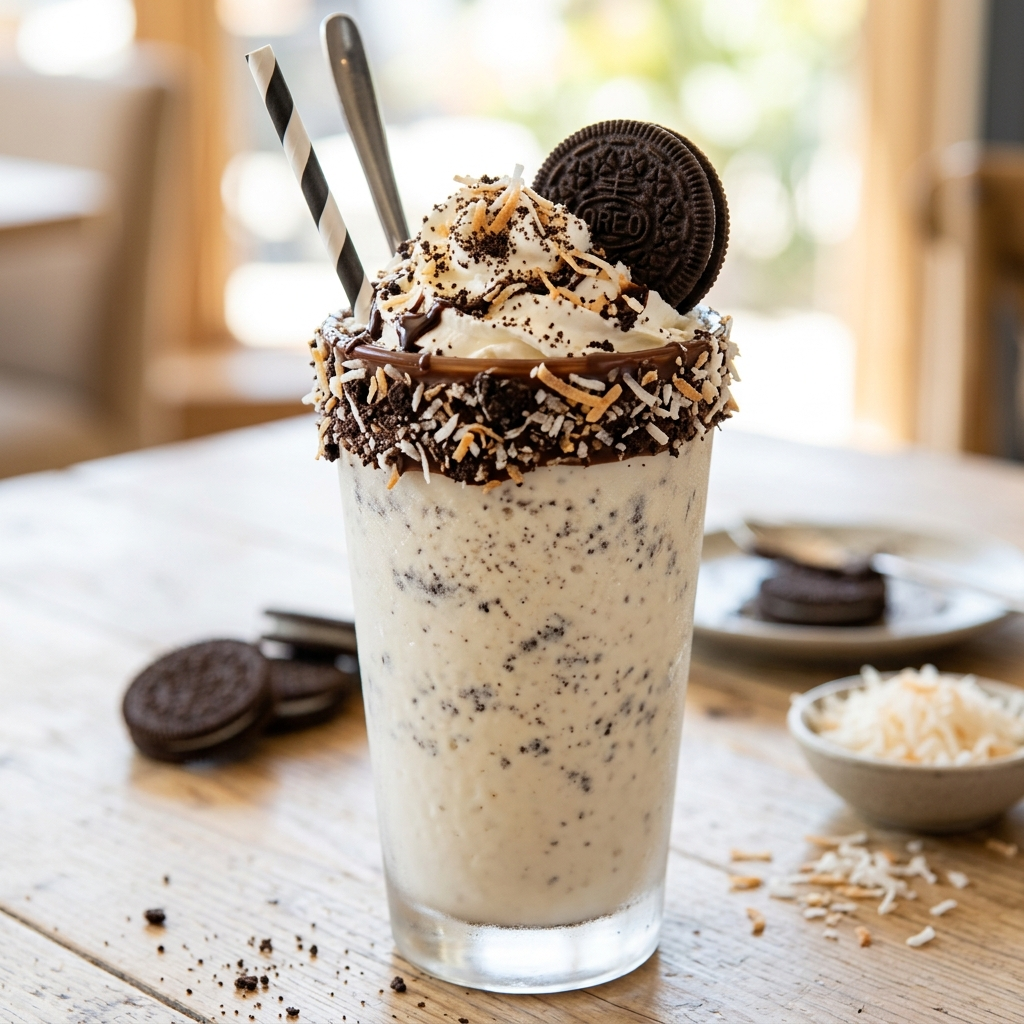
- Toasted Coconut Shavings: Large flakes provide a satisfying crunch.
- Oreo “Dust”: A light sifting of finely ground cookies over the top.
- White Chocolate Drizzle: Melted cocoa butter-based chocolate adds a luxurious sheen.
Beverage Pairings
- Coffee: A bold, dark roast or an Espresso to cut through the sweetness.
- Cocktails: A Coconut Mojito or a simple glass of chilled Prosecco.
5. Nutritional Information
(Per Serving – Based on 12 servings)
| Nutrient | Amount |
| Calories | 410 kcal |
| Total Fat | 28g |
| Saturated Fat | 18g |
| Carbohydrates | 36g |
| Fiber | 2g |
| Sugars | 24g |
| Protein | 4g |
Note: The high saturated fat content comes primarily from the coconut cream, which provides medium-chain triglycerides (MCTs). While indulgent, this dessert is a “sometimes food” best enjoyed in moderation.
6. Storage and Reheating
Refrigeration
Keep the Oreo Coconut Frost Blast in the refrigerator until the very moment of serving. It will maintain its structural integrity for up to 4 days if kept in an airtight container or tightly wrapped in plastic.
Freezing
This recipe freezes beautifully. To freeze:
- Flash-freeze the sliced pieces on a tray for 1 hour.
- Wrap individual slices in parchment paper and then foil.
- Store for up to 1 month.
- To Eat: Let it sit at room temperature for 15 minutes before consuming for a “semi-freddo” texture.
7. Expert Tips and Variations
Professional Chef Tips
- The “Double-Chill” Method: Chill your mixing bowl and whisk attachment in the freezer for 15 minutes before whipping the cream. This results in more stable peaks.
- Coconut Cream Selection: Use only full-fat canned coconut milk. Place the can in the fridge overnight and use only the solidified “cream” at the top.
Creative Variations
- The Minty Blast: Add 1/2 teaspoon of peppermint extract to the Oreo base.
- The Tropical Fruit Twist: Layer in thinly sliced mango between the coconut frost and the Oreo crumbles.
- Vegan Adaptation: Substitute heavy cream with a coconut-based whipping cream and ensure your Oreos are the standard vegan-friendly version.
8. Ingredients Section
The Base
- 24 (approx. 260g) Standard Oreo Cookies
- 5 tbsp (70g) Unsalted Butter, melted
- 1/4 tsp Sea Salt (to balance the sugar)
The Coconut Frost Layer
- 15 oz (400ml) Full-fat Coconut Cream (Chilled overnight)
- 1 cup (240ml) Heavy Whipping Cream (36% fat)
- 1/2 cup (60g) Powdered Sugar, sifted
- 1 tsp Pure Vanilla Extract
- 1/2 cup (45g) Shredded Sweetened Coconut
The Topping
- 6 Oreos, roughly chopped
- 1/4 cup Toasted Coconut flakes
9. Step-by-Step Instructions
Step 1: Prepare the Foundation
Place the 24 Oreos in a food processor. Pulse until you reach a fine, sandy texture. Pour in the melted butter and sea salt. Pulse 3-4 more times until the mixture looks like wet sand. Press this firmly into the bottom of your lined springform pan. Use the bottom of a flat glass to ensure even compression. Freeze for 15 minutes.
Step 2: The Whipping Process
In your chilled bowl, combine the solidified coconut cream (discard the watery liquid or save for smoothies), heavy cream, and vanilla. Start on low speed, gradually increasing to medium-high.
Step 3: Sweeten and Stabilize
Once soft peaks form, gradually add the powdered sugar. Continue whipping until stiff peaks form. Fold in the shredded coconut gently using a silicone spatula to maintain the airiness.
Step 4: The Assembly
Pour the coconut frost mixture over the chilled Oreo base. Use your offset spatula to create a perfectly flat top or decorative “waves.”
Step 5: The Final Blast
Scatter the chopped Oreos and toasted coconut flakes over the top. Press them very lightly into the cream so they adhere.
Step 6: The Long Chill
Cover the pan with plastic wrap (without touching the surface) and refrigerate for at least 4 hours, though overnight is preferred for the best flavor infusion.
10. Frequently Asked Questions (FAQ)
Q: Can I use low-fat coconut milk?
A: No. Low-fat versions lack the fat content required to hold air when whipped. Your “Blast” will turn into a “Slump.”
Q: Why is my coconut cream not whipping?
A: It likely wasn’t cold enough. Ensure the can is refrigerated for at least 24 hours. If it still won’t stiffen, you can add a stabilizer like “Whip It” or a tablespoon of instant vanilla pudding mix.
Q: How do I toast coconut flakes without burning them?
A: Place them in a dry skillet over medium-low heat. Shake the pan constantly. They go from white to burnt in seconds, so remove them the moment they turn golden brown.
Q: Can I use Golden Oreos instead?
A: Absolutely! This creates a “Vanilla Coconut” profile that is equally delicious, though it lacks the visual “Blast” contrast of the dark cocoa.


