Table of Contents
Imagine a dessert that’s rich, creamy, and satisfying, yet requires absolutely no baking. That’s exactly what you get with these incredible no-bake cheesecake cups. They are packed with flavor and so easy to assemble, you’ll wonder why you haven’t made them sooner. These individual cheesecake cups are a delightful treat for any occasion, from casual family dinners to elegant gatherings.
Once you try this recipe, I guarantee it will become a staple in your kitchen. The combination of a buttery graham cracker crust, a luscious cheesecake filling, and sweet cherry topping is simply irresistible. Get ready to impress everyone with minimal effort, enjoying delicious individual desserts that vanish quickly.
What Makes This Dish Worth Making
There are so many reasons to fall in love with these cherry cheesecake cups. First and foremost, they are a no-bake wonder. That means no heating up your kitchen, no water baths, and no worrying about cracked cheesecake tops. It’s a foolproof way to get that classic cheesecake flavor without any of the traditional fuss.
These individual portions are also incredibly convenient. Each person gets their own perfect little dessert, eliminating the need for slicing and serving. This makes them ideal for parties, potlucks, or even just a sweet indulgence after dinner. Plus, they look absolutely adorable, especially when served in clear cups where you can see all the beautiful layers.
You can easily prepare them ahead of time, which is a huge bonus when you’re entertaining. Just assemble, chill, and pull them out when you’re ready to serve. The simple ingredients and straightforward process mean even novice bakers can achieve spectacular results. They truly are a crowd-pleaser that delivers on both taste and ease.
Ingredients You Will Need
Gathering your ingredients for these cheesecake cups is straightforward. For the crust, you’ll need about nine full graham cracker sheets. If you can’t find sheets, look for pre-crushed graham cracker crumbs; you’ll need about 1 ½ cups. Granulated sugar adds a touch of sweetness to the crust, and you’ll need melted butter to bind it all together. I usually opt for unsalted butter, but salted works too if that’s what you have on hand. Just be aware of the salt content.
For the creamy cheesecake filling, start with one 8-ounce block of full-fat cream cheese. Make sure it’s softened to room temperature, which is crucial for a smooth, lump-free mixture. You’ll also need one 14-ounce can of sweetened condensed milk, which provides both sweetness and that signature creamy texture. Fresh lemon juice, about ¼ cup from half a lemon, adds a bright, tangy counterpoint that really brings out the cheesecake flavor. Finally, for the topping, grab one 21-ounce can of cherry pie filling. While homemade is great, store-bought makes this recipe incredibly quick and easy.

How to Make It Step by Step
Making these delightful no-bake cherry cheesecake cups is a breeze. Follow these steps for perfect results every time.
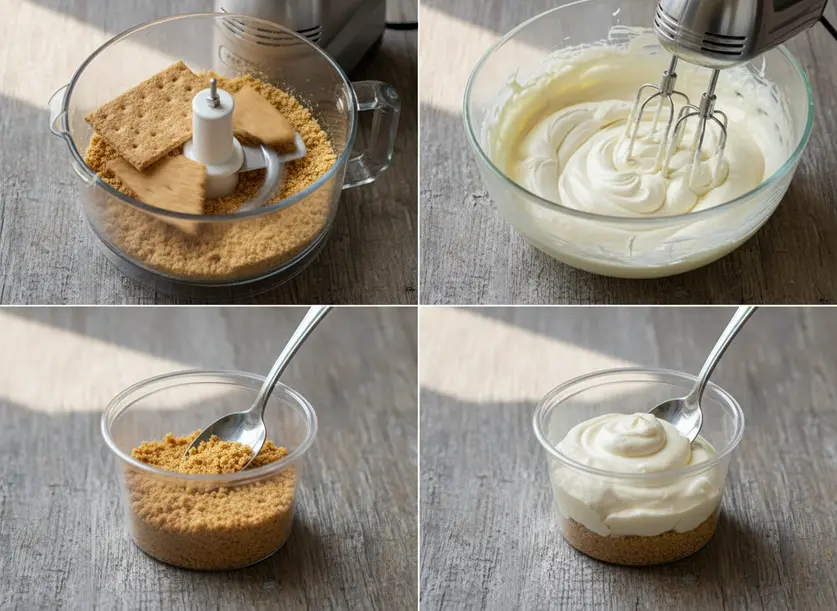
- Prepare the Crust: In a food processor, combine the graham cracker sheets, granulated sugar, and melted butter. Pulse the mixture until it resembles moist sand. If you don’t have a food processor, place the graham crackers in a Ziploc bag and crush them with a rolling pin, then mix with sugar and butter in a bowl.
- Make the Filling: In a large mixing bowl, add your softened cream cheese, sweetened condensed milk, and lemon juice. Using an electric mixer on medium speed, beat the ingredients together until the mixture is completely smooth and creamy. Ensure there are no lumps of cream cheese.
- Assemble the First Layer: Grab your individual serving cups. I find 9-ounce clear plastic cups work perfectly. Spoon a generous layer of the graham cracker mixture into the bottom of each cup. Gently press it down with the back of a spoon to create a firm base.
- Add the Cheesecake Layer: Carefully spoon a layer of the creamy cheesecake mixture over the graham cracker crust in each cup. Spread it evenly to create a distinct layer.
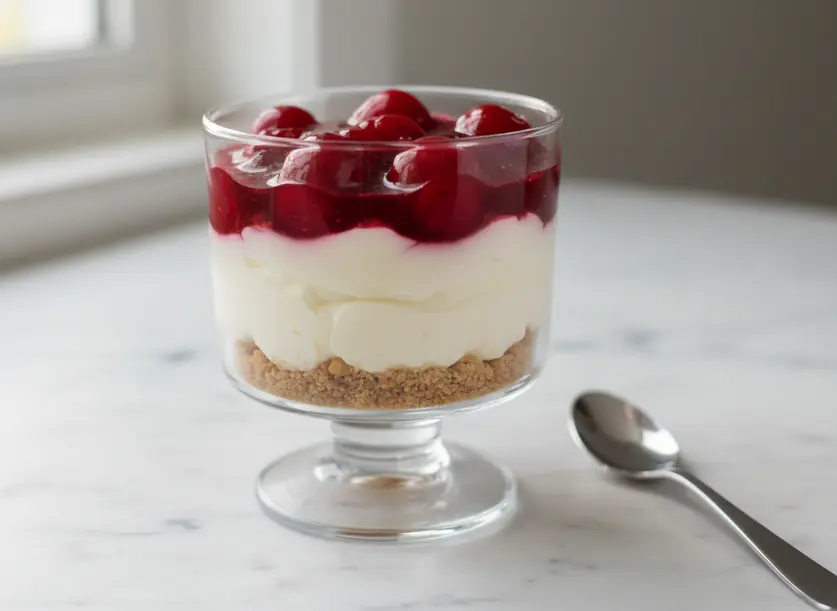
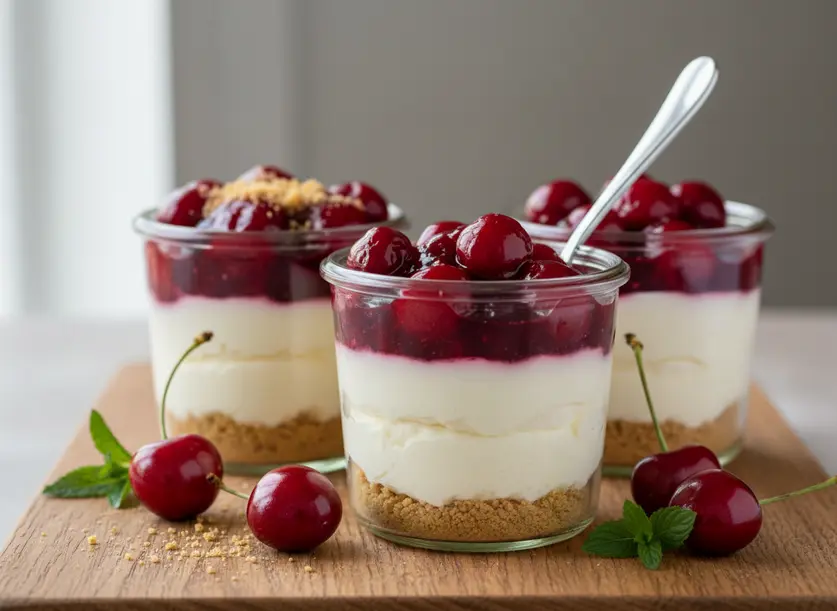
- Top with Cherries: Next, add a layer of the cherry pie filling over the cheesecake mixture. You can spread it gently or leave it slightly mounded.
- Repeat Layers: If your cups are large enough, repeat the layers: add another graham cracker layer, followed by more cheesecake filling, and then a final layer of cherry pie filling. You can finish with a sprinkle of extra graham cracker crumbs on top for garnish.
- Chill: Once all your cups are assembled, place them in the refrigerator. Chill them for at least 1 hour, or preferably longer, until they are firm and well-set. This chilling time is essential for the cheesecake to firm up and for the flavors to meld beautifully.
- Serve: When ready to enjoy, simply grab a spoon and dig in! No cutting required. These are best served cold.
Tips for the Best Results
Achieving perfect cheesecake cups is simple when you keep a few key tips in mind. First, always make sure your cream cheese is at room temperature before mixing. This is crucial for a smooth, lump-free cheesecake filling. If your cream cheese is cold, it will be hard to incorporate, leading to a grainy texture. Pull it out of the fridge at least 30 minutes to an hour before you plan to start.
Don’t skip the chilling time. Refrigerating for at least an hour allows the cheesecake mixture to set properly, making it firm and easy to eat with a spoon. If you try to serve them too soon, the filling might be a bit too soft. For best results and flavor, chill them for 2-3 hours, or even overnight.
For the graham cracker crust, if you don’t have a food processor, place the crackers in a sturdy bag and crush them with a rolling pin. Just ensure they are finely crushed to resemble sand; larger pieces can make the crust too crumbly. The melted butter quantity is important here; too little, and the crust won’t hold together, too much, and it’ll be greasy. Aim for a mixture that clumps together when pressed.
When storing leftovers, cover the cheesecake cups tightly with plastic wrap. This prevents them from drying out and absorbing any odors from the refrigerator. Stored properly, they will last in the fridge for up to 5 days, making them a fantastic make-ahead dessert.
Variations to Try
These cheesecake cups are incredibly versatile, allowing you to get creative with flavors and toppings. While cherry is a classic, you can easily swap out the pie filling for other fruits. Try a canned blueberry or strawberry pie filling for a different fruity twist. You could even use fresh fruit compotes you’ve made yourself, just ensure they are cooled completely before layering.
Beyond fruit, consider adding chocolate. A swirl of melted chocolate or a layer of chocolate ganache between the cheesecake and crust could be delicious. You could also mix mini chocolate chips into the cheesecake filling itself. For a nutty flavor, try swapping out half of the graham cracker crumbs for finely chopped pecans or walnuts in the crust.
Another fun variation is to experiment with different crust bases. Instead of graham crackers, use crushed Nilla wafers, Oreo cookies (with or without the cream filling), or even gingersnap cookies for a spiced flavor. Each of these options will give your cheesecake cups a unique character. You can also add whipped cream or fresh berries on top right before serving for an extra touch of elegance.
FAQ
Can I use low-fat cream cheese for cheesecake cups?
I highly recommend sticking to full-fat cream cheese for these cheesecake cups. The fat content is crucial for achieving that rich, creamy texture and ensures the filling sets properly. Low-fat or whipped cream cheese varieties tend to have more water content, which can result in a softer, less stable, and sometimes grainy filling.
How long do these no-bake cheesecake cups last in the fridge?
When stored properly, these cheesecake cups can last for up to 5 days in the refrigerator. Make sure to cover them tightly with plastic wrap to prevent them from drying out or absorbing other food odors. They are a fantastic make-ahead dessert, perfect for preparing a day or two in advance of an event.
What if my cheesecake filling isn’t smooth?
If your cheesecake filling turns out lumpy, it’s usually because your cream cheese wasn’t soft enough when you started mixing. To fix this, you can try beating the mixture for a longer period with an electric mixer, scraping down the sides of the bowl frequently. If it’s still lumpy, a quick pass through a fine-mesh sieve can help, but preventing lumps by using very soft cream cheese from the start is always the best approach.
No-Bake Cherry Cheesecake Cups
Ingredients
Method
- In a food processor, combine the graham cracker sheets, granulated sugar, and melted butter. Pulse the mixture until it resembles moist sand. If you don't have a food processor, place the graham crackers in a Ziploc bag and crush them with a rolling pin, then mix with sugar and butter in a bowl.
- In a large mixing bowl, add your softened cream cheese, sweetened condensed milk, and lemon juice. Using an electric mixer on medium speed, beat the ingredients together until the mixture is completely smooth and creamy. Ensure there are no lumps of cream cheese.
- Grab your individual serving cups (9-ounce clear plastic cups work perfectly). Spoon a generous layer of the graham cracker mixture into the bottom of each cup. Gently press it down with the back of a spoon to create a firm base.
- Carefully spoon a layer of the creamy cheesecake mixture over the graham cracker crust in each cup. Spread it evenly to create a distinct layer.
- Next, add a layer of the cherry pie filling over the cheesecake mixture. You can spread it gently or leave it slightly mounded.
- If your cups are large enough, repeat the layers: add another graham cracker layer, followed by more cheesecake filling, and then a final layer of cherry pie filling. You can finish with a sprinkle of extra graham cracker crumbs on top for garnish.
- Once all your cups are assembled, place them in the refrigerator. Chill them for at least 1 hour, or preferably longer, until they are firm and well-set. This chilling time is essential for the cheesecake to firm up and for the flavors to meld beautifully.
- When ready to enjoy, simply grab a spoon and dig in! No cutting required. These are best served cold.


