1. Introduction
Imagine a dessert so velvety and rich that it feels like an act of rebellion against your fitness goals, yet it consists almost entirely of fruit. Enter the Chocolate Banana Cream Freeze. Often affectionately dubbed “Nice Cream” by the plant-based community, this dish has evolved from a niche vegan hack into a global culinary phenomenon.
The beauty of this recipe lies in the science of the banana itself. Bananas possess a unique starch-to-sugar ratio and a high pectin content. When frozen at peak ripeness and aerated in a high-speed blender, these fibers transform into a structural matrix that mimics the mouthfeel of heavy dairy cream.
The origin of this “cream freeze” traces back to the early 2010s, rising alongside the “clean eating” movement. However, its significance goes deeper than just health. It is a masterclass in zero-waste cooking, turning overripe, spotted bananas that might otherwise be discarded into a sophisticated, antioxidant-rich dessert. Whether you are a parent looking for a nutritious after-school snack or a gourmet enthusiast seeking a base for a complex sundae, this recipe is your canvas.
2. Recipe Overview
- Cuisine Type: American Modern / Plant-Based
- Difficulty Level: Beginner
- Prep Time: 10 minutes (plus 4+ hours freezing time)
- Churn Time: 2–5 minutes
- Dietary Classifications: Vegan, Gluten-Free, Dairy-Free, Soy-Free, No Added Sugar (Paleo-friendly)
3. Equipment and Tools
To achieve the signature “soft serve” texture, the quality of your equipment is paramount.
- High-Speed Blender or Food Processor: A motor with at least 700–1000 watts is recommended to handle the density of frozen fruit without overheating.
- Baking Sheet: Used for flash-freezing banana slices to prevent clumping.
- Silicone Spatula: Essential for scraping down the sides of the container during the blending process.
- Airtight Container: A shallow stainless steel or BPA-free plastic container (approx. 1-liter volume) for firming up the freeze if not serving immediately.
- Standard Measuring Cups and Spoons: For precise cocoa and add-in ratios.
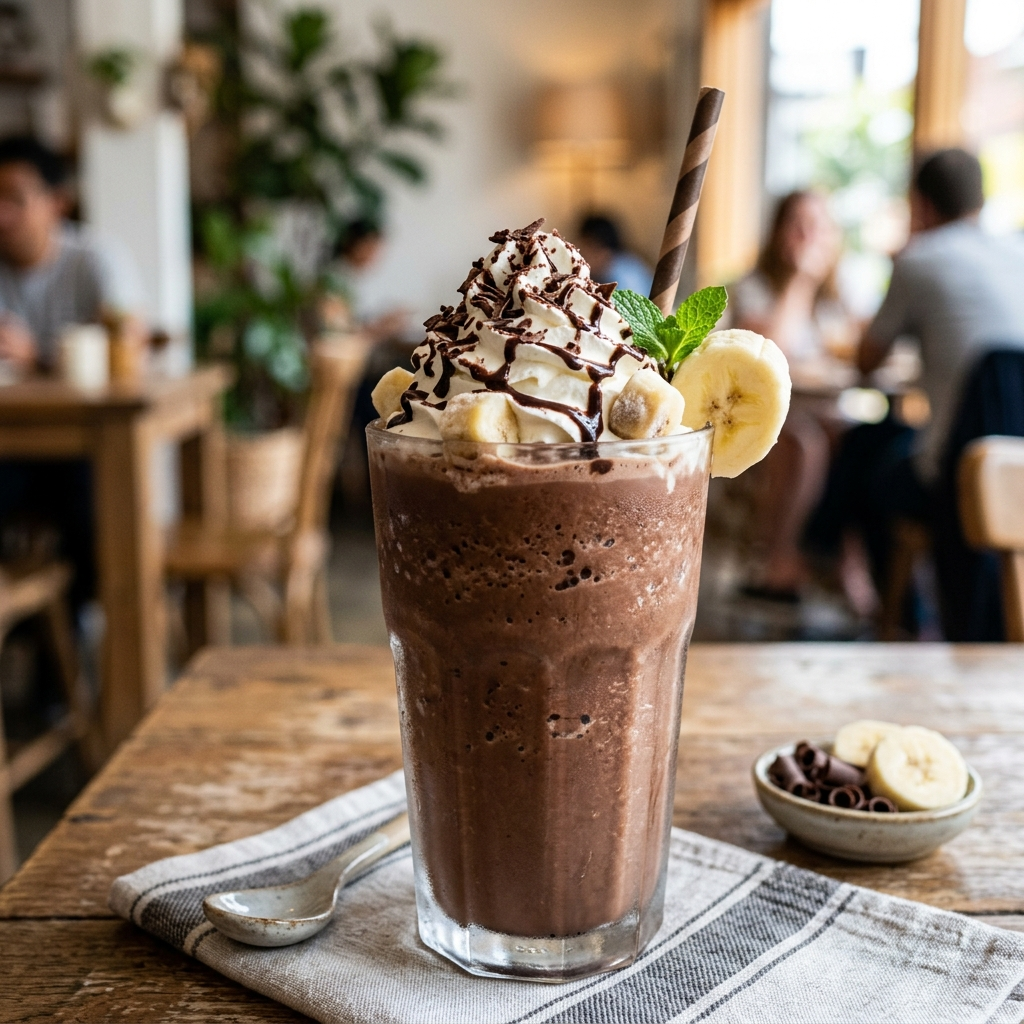
4. Serving Suggestions
The Chocolate Banana Cream Freeze is versatile enough for a casual bowl or a fine-dining presentation.
Plating Recommendations
- The Classic Scoop: Use a warmed ice cream scoop to create perfect spheres. Serve in a chilled glass coupe for an elegant look.
- The Breakfast Bowl: Serve in a wide wooden bowl, topped with granola and hemp seeds for a “smoothie bowl” aesthetic.
Garnish Ideas
- Textures: Toasted cacao nibs, crushed hazelnuts, or a sprinkle of flaky sea salt (which intensifies the chocolate flavor).
- Freshness: A sprig of mint or sliced strawberries to cut through the richness.
Beverage Pairings
- Non-Alcoholic: An oat milk latte or a cold-brew coffee complements the earthy notes of the cocoa.
- Wine Pairing: If serving as a dessert, a slightly chilled Ruby Port or a Lambrusco pairs beautifully with the dark chocolate profile.
5. Nutritional Information
(Per 1-cup serving)
| Nutrient | Amount |
| Calories | 165 kcal |
| Total Fat | 1.5g |
| Carbohydrates | 38g |
| Fiber | 6g |
| Sugars | 19g (Natural) |
| Protein | 3g |
| Potassium | 540mg |
Health Benefits: This dessert is high in Potassium (heart health) and Magnesium (muscle recovery). The raw cacao provides a significant dose of flavonoids, which are powerful antioxidants known to improve blood flow and mood.
6. Storage and Reheating
Unlike traditional ice cream, this “freeze” lacks stabilizers like egg yolks or heavy gums, meaning its texture is best immediately after blending.
- Refrigeration: Not recommended. It will turn into a liquid smoothie within 20 minutes.
- Freezing: If you have leftovers, store them in an airtight container. Press a piece of parchment paper directly onto the surface to prevent ice crystals (freezer burn).
- “Reheating” (Softening): If frozen solid, do not microwave. Let it sit at room temperature for 10–15 minutes before scooping to regain the creamy consistency.
7. Expert Tips and Variations
Professional Chef Tips
- The Ripeness Rule: Use bananas that are “leopard spotted.” This is when the starch has fully converted to sugar, providing natural sweetness without the need for honey or maple syrup.
- The Liquid Ratio: Add liquid (nut milk) only if your blender is struggling. Too much liquid turns a “freeze” into a “shake.”
Creative Variations
- Nut Butter Swirl: Fold in two tablespoons of almond or peanut butter after blending for a “Reese’s” style flavor.
- Mocha Freeze: Add 1 teaspoon of espresso powder to the blend.
- Protein Boost: Add one scoop of chocolate pea protein powder for a post-workout recovery treat.
8. Ingredients Section
The Base
- 4 Large Bananas: (Approx. 500g) Must be peeled, sliced into coins, and frozen.
- 3 tbsp Unsweetened Cocoa Powder: (22g) Use Dutch-processed cocoa for a darker, mellower flavor or raw cacao for more bitterness and nutrients.
The Liquids & Enhancers
- 2 tbsp Unsweetened Almond Milk: (30ml) Only if needed for blending.
- 1 tsp Pure Vanilla Extract: Adds depth.
- 1/8 tsp Fine Sea Salt: To balance the sweetness.
Sourcing Recommendations
- Bananas: Look for Fair Trade certified bananas to ensure ethical sourcing.
- Chocolate: High-quality cocoa powder (like Valrhona or Guittard) significantly elevates the final taste.
9. Step-by-Step Instructions
Step 1: The Prep (24 Hours Prior)
Peel your ripe bananas. Slice them into 1/2-inch coins. Lay them in a single layer on a parchment-lined baking sheet. Freeze for at least 4 hours, preferably overnight.
- Why? Freezing them individually prevents them from forming a solid “brick” that can break blender blades.
Step 2: The Initial Break-Down
Place the frozen banana coins into your high-speed blender or food processor. Pulse 5–10 times. At this stage, the bananas will look like “crumbs” or coarse gravel.
Step 3: Integrating the Flavor
Add the cocoa powder, vanilla extract, and sea salt.
Step 4: The Creaming Phase
Turn the blender to a medium-high setting. Use the tamper (if using a Vitamix) to push the fruit into the blades. If using a food processor, stop every 30 seconds to scrape the sides.
- Visual Cue: You are looking for a “four-leaf clover” vortex in a blender or a smooth, glossy “ball” in a processor.
Step 5: Final Consistency Check
If the mixture is too thick, add the almond milk one tablespoon at a time. Continue blending until the texture is exactly like soft-serve ice cream.
Step 6: Serving or Firming
Serve immediately for a soft-serve texture. For “hard-pack” ice cream, transfer to a container and freeze for an additional 2 hours.
10. Frequently Asked Questions (FAQ)
Q: Can I make this without a high-speed blender?
A: Yes! A standard food processor actually works better than a cheap blender because the blades are wider and generate less heat, preventing the “freeze” from melting during the process.
Q: My freeze is too runny. What happened?
A: This usually happens if the bananas weren’t fully frozen or if too much liquid was added. To fix it, put the mixture back in the freezer for 45 minutes and whisk it every 15 minutes.
Q: Can I use other fruits?
A: Bananas are the best for creaminess, but you can swap 50% of the bananas for frozen mango or frozen avocado to maintain the texture while changing the flavor profile.
Q: Is this safe for toddlers?
A: Absolutely. It is 100% fruit and cocoa. Just be mindful of the caffeine content in cocoa powder if serving late at night.
Q: How long do the frozen bananas last in the freezer?
A: You can keep sliced bananas in a freezer bag for up to 3 months. After that, they may develop a “freezer taste.”


