1. Introduction: The Warm Embrace of Cinnamon and Sugar
There is a specific kind of magic that happens when the aroma of toasted cinnamon and caramelized brown sugar wafts through a home. It’s an olfactory hug, a universal signal that something comforting is on the horizon. For many, the classic cinnamon roll represents the pinnacle of weekend baking—but let’s be honest: not everyone has the three hours required for proofing yeast and kneading dough.
Enter the Cinnamon Roll Poke Cake.
This recipe is a love letter to those who crave the gooey, spice-laden center of a cinnamon roll but desire the effortless preparation of a sheet cake. The “poke” technique—a mid-century baking innovation—allows a rich, buttery cinnamon filling to seep deep into the crumb of the cake, ensuring that every single bite is saturated with flavor. This isn’t just a cake; it’s a modern reimagining of a breakfast classic, transformed into a sophisticated dessert that bridges the gap between nostalgic home cooking and professional pastry craft.
Originating from the American “potluck” culture, poke cakes became a staple because of their incredible moisture and ease of transport. By marrying this technique with the flavor profile of a Nordic-inspired cinnamon bun, we’ve created a dish that is as visually stunning with its marbled interior as it is delicious.
2. Recipe Overview
- Cuisine Type: American Fusion / Dessert
- Difficulty Level: Easy to Intermediate
- Prep Time: 20 minutes
- Cook Time: 30 minutes
- Total Time: 50 minutes (plus cooling time)
- Dietary Classifications: Vegetarian. (Can be modified for Gluten-Free or Dairy-Free diets).
3. Equipment and Tools
To achieve the perfect texture and even distribution of the cinnamon filling, having the right tools is essential.
- Baking Pan: A standard 9×13 inch (23×33 cm) rectangular baking dish. Glass or ceramic is preferred for even heat distribution.
- Mixing Bowls: One large bowl for the cake batter and one medium, microwave-safe bowl for the cinnamon filling.
- Electric Mixer: A hand mixer or stand mixer equipped with a paddle attachment.
- Poking Tool: The handle of a wooden spoon (approximately 1/2 inch in diameter) is ideal. Alternatively, a large straw can be used.
- Offset Spatula: For spreading the cream cheese frosting smoothly across the surface.
- Whisk: To ensure the glaze is lump-free.
4. Serving Suggestions
This cake is a showstopper on its own, but the right accompaniments can elevate it to a gourmet experience.
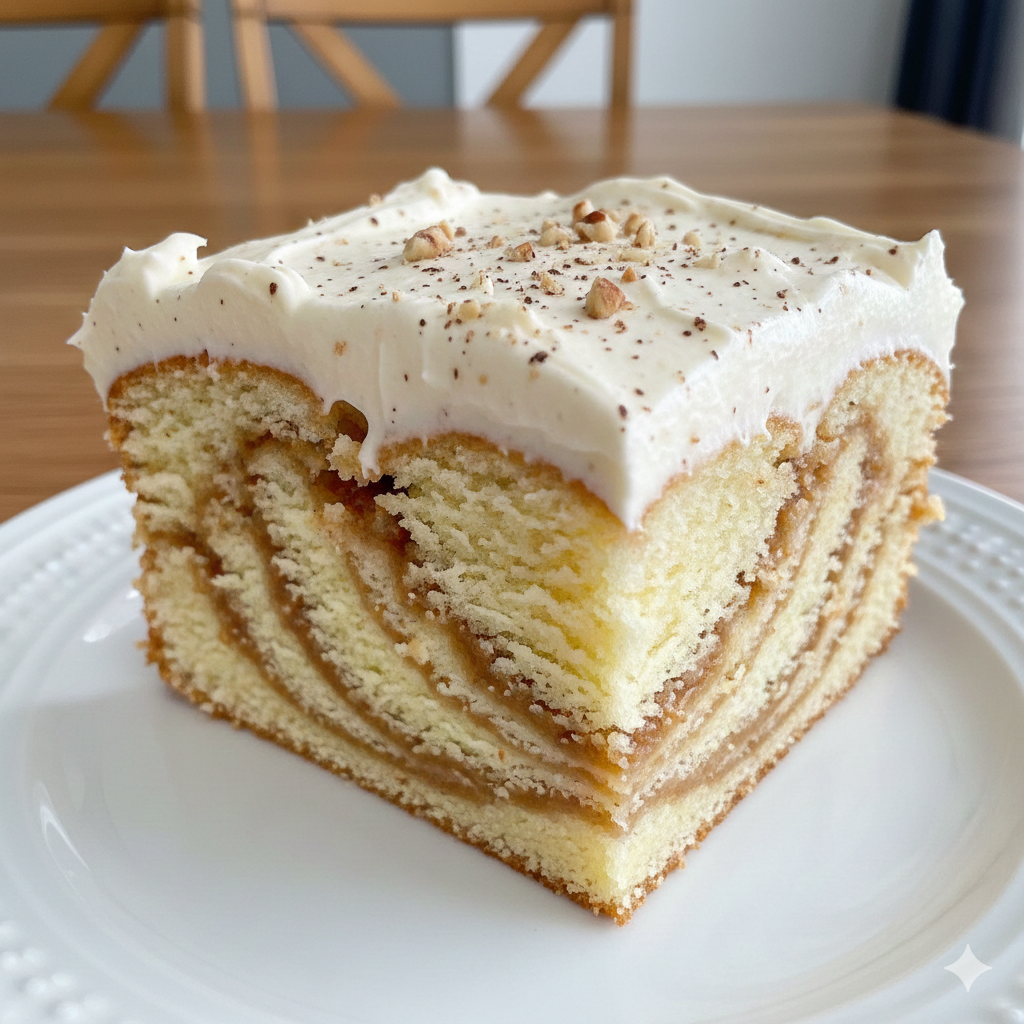
- Plating: Serve a generous square slightly warm. The warmth reactivates the buttery cinnamon filling, making it extra “gooey.”
- Garnish: A light dusting of freshly grated nutmeg or a sprinkle of toasted pecans adds a delightful crunch.
- Beverage Pairings:
- Coffee: A dark roast or a bold Espresso balances the sweetness.
- Tea: An Earl Grey or a spicy Chai latte complements the cinnamon notes.
- Wine: A late-harvest Riesling or a glass of Tawny Port offers a sophisticated finish.
- Side Dishes: A dollop of unsweetened whipped cream or a scoop of high-quality vanilla bean ice cream provides a cool contrast to the spice.
5. Nutritional Information (Per Serving)
Note: Estimates based on 15 servings.
| Nutrient | Amount |
| Calories | 380 kcal |
| Total Fat | 18g |
| Saturated Fat | 10g |
| Cholesterol | 55mg |
| Sodium | 310mg |
| Total Carbohydrates | 52g |
| Dietary Fiber | 1g |
| Sugars | 38g |
| Protein | 4g |
Health Note: While this is an indulgent dessert, cinnamon is known for its antioxidant properties and potential to help manage blood sugar levels.
6. Storage and Reheating
Because of the dairy content in the cream cheese frosting, proper storage is vital.
- Refrigeration: Store the cake in an airtight container or tightly covered with plastic wrap in the refrigerator for up to 5 days.
- Freezing: This cake freezes beautifully. Wrap individual slices in parchment paper and then foil. It will stay fresh for up to 3 months. Thaw in the refrigerator overnight.
- Reheating: To recapture that “fresh out of the oven” feel, microwave a single slice for 15-20 seconds. Do not overheat, or the frosting will melt into a liquid.
7. Expert Tips and Variations
Professional Tips
- The “Poke” Timing: Poke the holes while the cake is still slightly warm, but not piping hot. If the cake is too hot, it may crumble; if it’s too cold, it won’t absorb the filling as effectively.
- Uniform Holes: Space your holes about 1 inch apart in a grid pattern to ensure every slice gets an equal amount of cinnamon goodness.
Creative Variations
- The “Nutty” Roll: Add 1/2 cup of finely chopped walnuts or pecans to the cinnamon filling for added texture.
- Apple Pie Hybrid: Fold 1 cup of finely diced, sautéed Granny Smith apples into the cake batter before baking.
- Pumpkin Spice: Replace the vanilla cake base with a pumpkin-flavored sponge for a seasonal autumn twist.

8. Ingredients Section
For the Cake Base
- White Cake Mix: 1 box (15.25 oz / 432g) – or use your favorite homemade vanilla sponge recipe.
- Water/Milk: 1 cup (240ml). Using whole milk adds richness.
- Vegetable Oil: 1/2 cup (120ml).
- Large Eggs: 3 units.
- Vanilla Extract: 1 tsp (5ml).
For the Cinnamon Filling
- Sweetened Condensed Milk: 1 can (14 oz / 397g).
- Unsalted Butter: 1/2 cup (113g), melted.
- Brown Sugar: 1/2 cup (100g), packed.
- Ground Cinnamon: 2 tbsp (15g).
For the Cream Cheese Frosting
- Cream Cheese: 8 oz (226g), softened to room temperature.
- Unsalted Butter: 1/4 cup (57g), softened.
- Powdered Sugar: 2 cups (240g).
- Milk: 1-2 tbsp (for consistency).
9. Step-by-Step Instructions
- Preparation: Preheat your oven to 350°F (175°C). Grease a 9×13 inch baking pan thoroughly with butter or non-stick spray.
- Bake the Base: In a large bowl, combine the cake mix, eggs, milk, and oil. Beat on medium speed for 2 minutes. Pour into the prepared pan and bake for 28-32 minutes, or until a toothpick inserted in the center comes out clean.
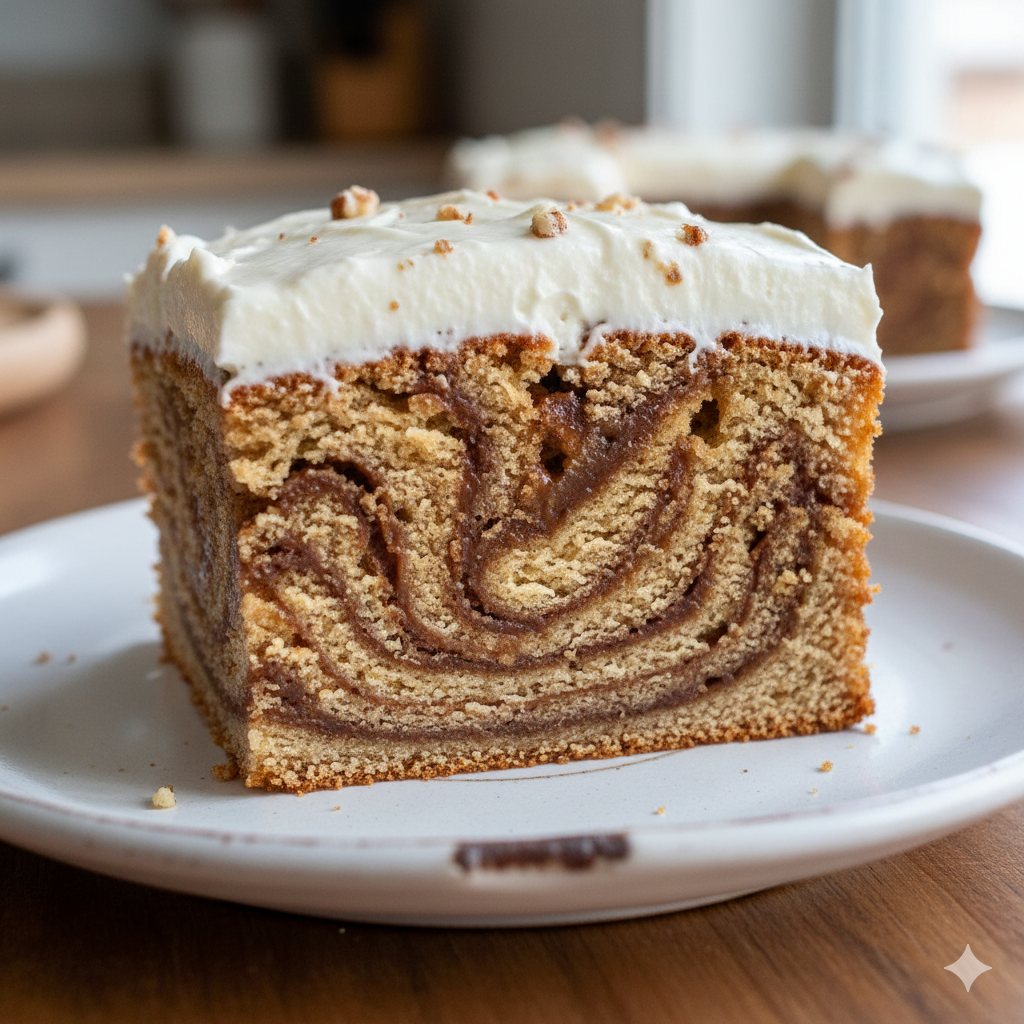
- Create the Channels: Allow the cake to cool for 10 minutes. Using the handle of a wooden spoon, poke holes across the entire surface of the cake. Be sure to go about 3/4 of the way down—don’t hit the bottom of the pan, or the filling will pool underneath.
- The Infusion: In a medium bowl, whisk together the sweetened condensed milk, melted butter, brown sugar, and cinnamon until smooth.
- The Pour: Slowly pour the cinnamon mixture over the cake, guiding it into the holes with a spatula. Let the cake sit for at least 30 minutes to absorb the liquid.
- The Frosting: Beat the cream cheese and butter until fluffy. Gradually add powdered sugar and vanilla. If it’s too thick, add milk one tablespoon at a time.
- Final Assembly: Spread the frosting over the cooled cake. For a professional look, create swirls with the back of a spoon.
- Chill: Refrigerate for at least 1 hour before serving to allow the flavors to meld and the filling to set.
10. Frequently Asked Questions (FAQ)
Q: Can I use a different flavored cake mix?
A: Absolutely. A yellow cake mix provides a more buttery flavor, while a spice cake mix will intensify the autumnal notes.
Q: My cinnamon filling is staying on top. What did I do wrong?
A: The holes might be too small or the cake might have cooled too much. Try gently widening the holes or slightly warming the filling before pouring.
Q: Can I make this dairy-free?
A: Yes. Use a dairy-free cake mix, swap the condensed milk for sweetened condensed coconut milk, and use vegan butter and cream cheese alternatives.
Q: How do I get the “marbled” look?
A: When you pour the cinnamon filling, use a knife to gently swirl it into the batter-filled holes. When sliced, this creates a beautiful “cinnamon roll” spiral effect.
Q: Can I make this in advance?
A: This cake actually tastes better the next day, making it the perfect “make-ahead” dessert for parties.


