1. Introduction
There is a common misconception in the world of fitness and nutrition that “healthy” must equate to “bland.” For years, athletes and wellness enthusiasts have endured chalky, uninspired shakes in the pursuit of muscle recovery. However, the Chocolate Protein Smoothie stands as a delicious rebuttal to that narrative. This isn’t just a drink; it’s a velvety, cocoa-infused experience that bridges the gap between a decadent dessert and a high-performance fuel source.
The origins of the chocolate-and-banana pairing can be traced back to tropical cuisines where the natural sweetness of ripe fruit was often balanced with the earthy bitterness of cacao. In modern culinary history, the “smoothie” gained traction in the 1960s, but it wasn’t until the late 20th century that the addition of protein powders transformed it from a snack into a staple of the “clean eating” movement.
What makes this specific recipe significant is its focus on whole-food synergy. By utilizing the natural creaminess of frozen fruit and the healthy fats of nut butters, we eliminate the need for processed thickeners. Whether you are a marathon runner looking for glycogen replenishment or a busy parent needing a quick, satiating breakfast, this smoothie offers a moment of pure, chocolatey indulgence without the sugar crash.
2. Recipe Overview
- Cuisine Type: Modern American / Health-Conscious
- Difficulty Level: Easy
- Prep Time: 5 minutes
- Total Time: 5 minutes
- Dietary Classifications: Vegetarian, Gluten-Free, Soy-Free (Vegan option included)
3. Equipment and Tools
To achieve that signature “soft-serve” consistency, the quality of your tools matters as much as the ingredients.
- High-Speed Blender: A motor with at least 1200 watts is recommended to pulverize frozen fruit and ice into a perfectly smooth texture without leaving grainy chunks.
- Volume Measurements: * Standard US Cup set (1 cup, 1/2 cup, 1/4 cup).
- Measuring spoons (1 tbsp, 1 tsp).
- Specifications: A blender jar with a minimum capacity of 32 ounces (950ml) to allow for proper aeration and vortex formation.
- Special Equipment Notes: A silicone spatula is essential for scraping down the sides of the blender to ensure every bit of protein powder is integrated.
4. Serving Suggestions
Presentation elevates a simple shake into a cafe-quality treat.
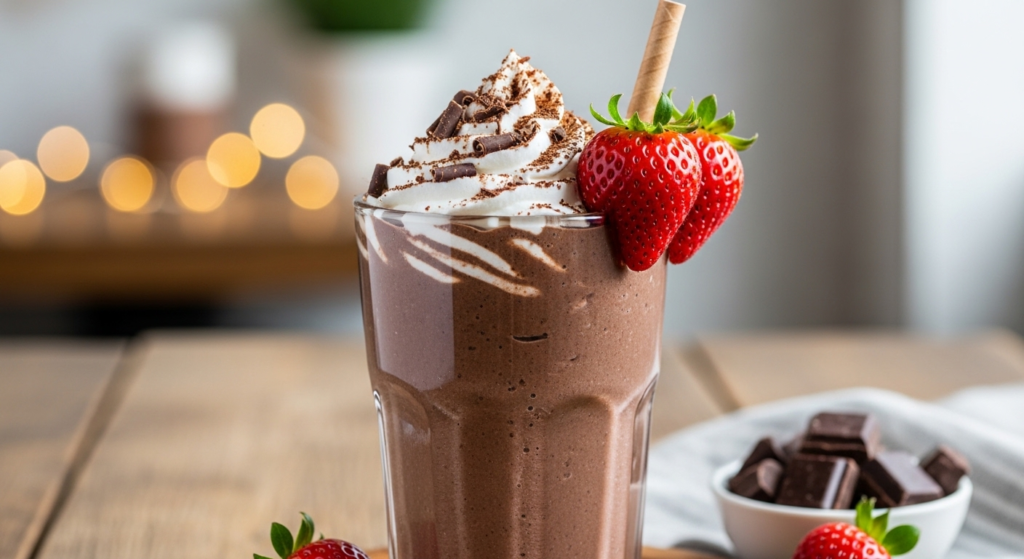
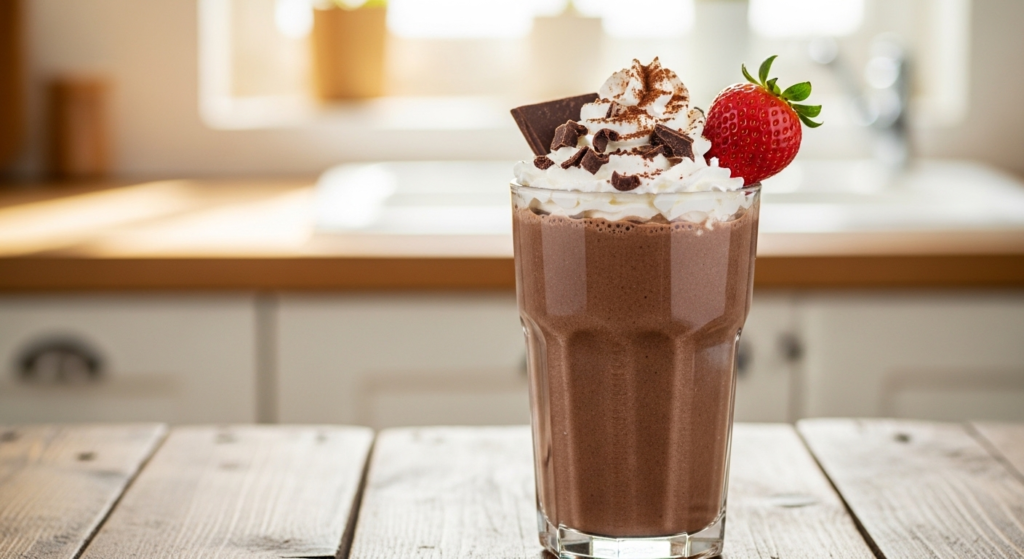
- Plating: Serve in a chilled 16-ounce glass jar or a tall hurricane glass.
- Garnish Ideas:
- A light dusting of unsweetened cocoa powder.
- A sprinkle of cacao nibs for a sophisticated crunch.
- Three thin slices of fresh banana arranged in a fan.
- A sprig of fresh mint for a pop of color and aroma.
- Side Dishes: Pairs beautifully with a side of lightly salted almonds or a slice of toasted sourdough with avocado.
- Beverage Pairings: If enjoying this as a snack, pair it with a shot of espresso (or blend the espresso directly in!) for a mocha-protein boost.
5. Nutritional Information
Per Serving (Approximate based on standard ingredients):
| Nutrient | Amount |
| Calories | 345 kcal |
| Protein | 28g |
| Total Fat | 12g |
| Carbohydrates | 35g |
| Dietary Fiber | 7g |
| Sugars | 18g (Natural from fruit) |
Health Benefits:
- Muscle Recovery: High-quality whey or plant protein provides essential amino acids.
- Antioxidants: Cacao is rich in polyphenols that help reduce inflammation.
- Digestive Health: High fiber content from the banana and optional flaxseeds supports gut motility.
6. Storage and Reheating
While smoothies are best enjoyed immediately, life happens.
- Refrigeration: Store in an airtight container for up to 12 hours. Note that separation is natural; shake vigorously before consuming.
- Freezing: Pour the mixture into silicone ice cube trays. When ready to eat, pop the “smoothie cubes” back into the blender with a splash of milk for an instant refresh.
- Reheating: N/A (Smoothies are served cold). Do not microwave.
7. Expert Tips and Variations
Professional Chef Tips
- The Freeze Factor: Always use frozen bananas. Peeling and freezing them at peak ripeness (when they have brown spots) ensures maximum sweetness and a texture similar to ice cream.
- The Liquid-First Rule: Always pour your liquid base into the blender first. This prevents the protein powder from getting stuck at the bottom and ensures a better blend.
Creative Variations
- The PB&C: Add 1 tablespoon of organic peanut butter for a classic Reese’s-style flavor profile.
- The “Green” Secret: Toss in a handful of baby spinach. The dark chocolate masks the color and flavor entirely, making it an easy way to get your greens.
- The Keto Twist: Swap the banana for 1/2 a frozen avocado and use a stevia-sweetened protein powder to lower the carb count significantly.
8. Ingredients Section
| Ingredient | Metric | Imperial | Substitution |
| Liquid Base | 240 ml | 1 cup | Unsweetened Almond, Soy, or Dairy Milk |
| Chocolate Protein | 30g | 1 scoop | Chocolate Collagen or Vegan Blend |
| Frozen Banana | 120g | 1 medium | Frozen Cauliflower (for lower sugar) |
| Cacao Powder | 10g | 1 tbsp | Cocoa Powder (Dutch-processed) |
| Nut Butter | 15g | 1 tbsp | Almond, Peanut, or Sunflower Butter |
| Ice (Optional) | 60g | 1/2 cup | Omit for a thicker, denser texture |
Quality Note: Use raw cacao powder rather than alkalized cocoa to retain more antioxidants and a deeper, more complex flavor.
9. Step-by-Step Instructions
- Prep the Base: Pour 1 cup of your chosen milk into the blender jar. This creates the “vortex” needed to pull down the solid ingredients.
- Add the Solids: Add the frozen banana chunks and the nut butter.
- The Protein Layer: Add one scoop of chocolate protein powder and the extra tablespoon of cacao. Adding powders after the solids helps prevent the powder from poofing up and sticking to the lid.
- Pulse to Start: Start the blender on the lowest setting and pulse 3-5 times. This breaks up the large frozen fruit chunks without overworking the motor.
- The High-Speed Blend: Increase the speed to high for 45 to 60 seconds.
- Check Consistency: Stop the blender. If the mixture is too thick, add milk 1 tablespoon at a time. If it’s too thin, add 2-3 ice cubes and blend again.
- Visual Cue: Look for a smooth, glossy surface with no visible flecks of powder or fruit.
- Final Pour: Use your spatula to pour the smoothie into a glass, ensuring you get every drop of that chocolatey goodness.
10. Frequently Asked Questions (FAQ)
Q: Can I make this without a high-speed blender?
A: Yes! However, you may need to slice your frozen bananas into very small coins and blend for an extra minute to ensure a smooth texture.
Q: My smoothie is too grainy. What happened?
A: Graininess usually comes from the protein powder or not blending long enough. Try a different brand of protein (isolate is usually smoother) or add a teaspoon of Greek yogurt for extra creaminess.
Q: Is it okay to use water instead of milk?
A: You can, but you will lose the creamy mouthfeel. If using water, I recommend adding a tablespoon of hemp seeds or avocado to provide some fat for texture.
Q: Can I prep this the night before?
A: It is not recommended, as the banana will oxidize and change the color to a dull brown. Instead, prep “smoothie packs” with the dry ingredients and fruit in a freezer bag, then just add milk and blend in the morning.
Q: Is cacao powder the same as cocoa powder?
A: Not quite. Cacao is processed at low temperatures and is more bitter/nutrient-dense. Cocoa is roasted at high temperatures. Both work, but cacao is the “healthier” choice.


