Table of Contents
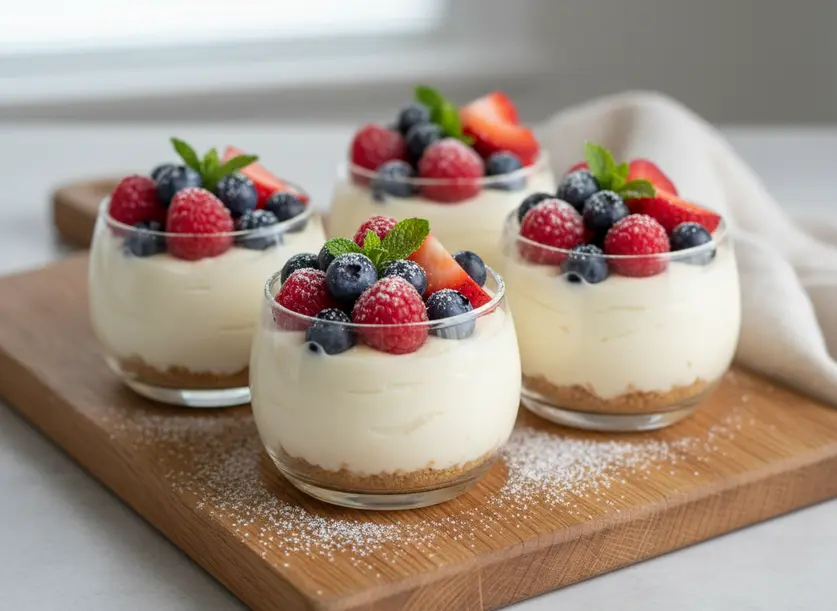
Are you craving a sweet treat but don’t want to turn on your oven? Learning how to make no bake cheesecake cups is the perfect solution for a delightful, easy dessert. These individual servings are not only charming but also incredibly simple to prepare, making them ideal for any occasion or just a quiet evening at home.
Imagine creamy, rich cheesecake filling nestled on a crisp cookie crust, all chilled to perfection. That’s exactly what you get with these no bake cheesecake cups. They’re a crowd pleaser that requires minimal effort and delivers maximum flavor, allowing you to enjoy a luxurious dessert without the fuss of baking.
What Makes This Dish Worth Making
These individual no bake cheesecake cups are a game changer for anyone who loves dessert but hates complicated recipes. The biggest draw is right in the name: no baking required! This means you can whip them up even on the hottest summer day without heating your kitchen. Plus, individual desserts are always a hit. They look elegant, are easy to serve, and help with portion control.
They’re fantastic for entertaining. You can make them ahead of time, freeing you up to enjoy your guests without last minute kitchen stress. The combination of the crumbly crust and the silky smooth filling creates a beautiful contrast in texture that’s incredibly satisfying. Whether it’s a casual backyard BBQ or a more formal gathering, these cheesecake cups fit right in. You’ll be surprised how something so simple can taste so decadent and impressive.
Ingredients You Will Need
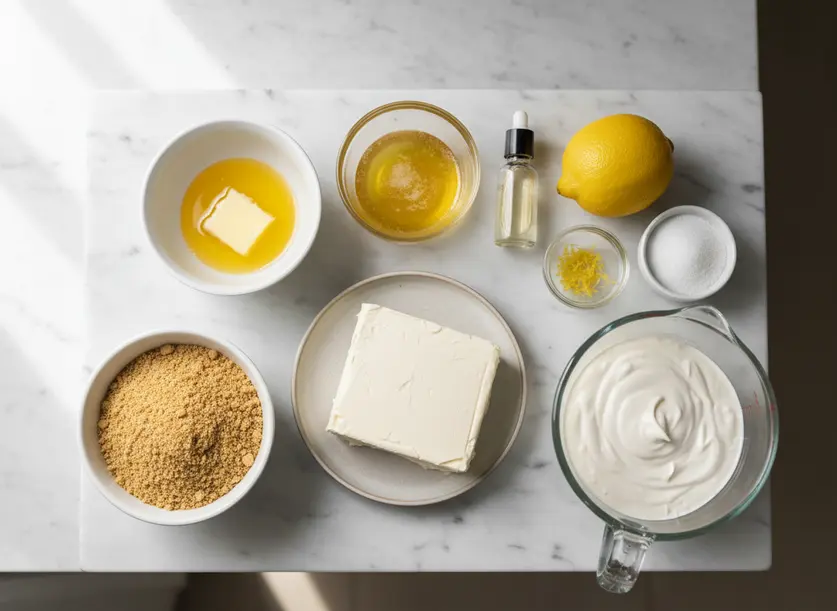
Gathering your ingredients is the first step to these delightful no bake cheesecake cups. You’ll need about 1 ½ cups of graham cracker crumbs for the crust. If graham crackers aren’t available, digestive biscuits or vanilla wafers are excellent substitutes, simply pulsed into fine crumbs. You’ll also need ¼ cup of melted unsalted butter to bind the crumbs together. If you only have salted butter, reduce the tiny pinch of salt you might add, or omit it altogether.
For the creamy filling, start with 16 ounces of full fat cream cheese, softened to room temperature. This is crucial for a smooth mixture, so don’t skimp on the softening time. Low fat or whipped cream cheese varieties won’t give you the same firm, rich texture. You’ll need 1 cup of granulated sugar, or you can adjust to ¾ cup if you prefer a less sweet dessert. Add 2 teaspoons of pure vanilla extract for that classic flavor, and the zest of one lemon for a subtle, bright tang—though this is optional, it truly enhances the taste.
The final star of the filling is 2 cups of cold heavy cream. Make sure it’s very cold for optimal whipping. If heavy cream isn’t accessible, you can try using a pre sweetened whipped topping (like Cool Whip) as a substitute, but be aware that it’s pre sweetened, so you’ll need to reduce the granulated sugar in the recipe. Always use the block cream cheese for the best results, as tub varieties tend to be too soft.
How to Make It Step by Step
Making these no bake cheesecake cups is a straightforward process. Follow these steps for perfect results every time.
- Prepare the Crust: In a medium bowl, combine the graham cracker crumbs with the melted butter and a pinch of salt if using unsalted butter. Stir until the crumbs are evenly moistened, resembling wet sand. This ensures a stable crust.
- Form the Bases: Divide the crumb mixture evenly among about 8 10 individual serving cups or jars. Press the mixture firmly into the bottom of each cup to create a compact crust. You can use the back of a spoon or your fingertips for this. Place these crusts in the refrigerator while you prepare the filling.
- Beat Cream Cheese and Sugar: In a large mixing bowl, beat the softened cream cheese with the granulated sugar using an electric mixer on medium speed. Continue mixing until the mixture is completely smooth and creamy, with no lumps remaining. Scrape down the sides of the bowl as needed.
- Add Flavorings: Stir in the vanilla extract and lemon zest (if using) into the cream cheese mixture. Mix until just combined, ensuring the flavors are well distributed.
- Whip the Heavy Cream: In a separate, chilled bowl, pour the very cold heavy cream. Using an electric mixer with a whisk attachment, beat the cream on high speed until soft peaks form. Be careful not to overbeat, as it can turn grainy.
- Fold in Whipped Cream: Gently fold half of the whipped cream into the cream cheese mixture using a rubber spatula. Use light, upward motions to maintain the airiness. Once mostly combined, fold in the remaining whipped cream until no white streaks are visible and the mixture is light and fluffy.
- Fill the Cups: Spoon or pipe the cheesecake filling evenly over the chilled crusts in each serving cup. If you want a clean look, a piping bag makes this step easy and mess free.
- Chill to Set: Cover the no bake cheesecake cups with plastic wrap and refrigerate for at least 4 hours, or preferably overnight. This chilling time is essential for the cheesecake to firm up and develop its full flavor. The longer they chill, the better they set.
- Garnish and Serve: Just before serving, top your chilled cheesecake cups with your favorite garnishes. Fresh berries, chocolate shavings, or a drizzle of caramel sauce are all excellent choices.

Tips for the Best Results
To ensure your no bake cheesecake cups turn out perfectly every time, keep these tips in mind. First, always make sure your cream cheese is at room temperature before you start mixing. This prevents lumps and ensures a super smooth, creamy filling that’s easy to work with. If your cream cheese is cold, it won’t combine properly with the sugar, leading to a grainy texture.
Secondly, ensure your heavy cream is very cold before whipping. Chilling your mixing bowl and whisk attachment for 10 15 minutes in the freezer before whipping can also significantly help. Cold cream whips up faster and holds its shape better, which is crucial for the light and airy texture of these cheesecakes. Overbeating the cream can make it grainy, so stop as soon as soft peaks form.
For a perfectly stable crust, press the crumbs down very firmly into your serving cups. You can use the bottom of a small glass or your fingers to compact them. A solid crust is key to keeping your individual cheesecakes intact when serving. If your crust still feels too loose, you might need a tiny bit more melted butter next time.
Finally, allow ample chilling time. While 4 hours is the minimum, an overnight chill truly makes a difference. The flavors meld together, and the cheesecake sets up beautifully, ensuring it’s firm enough to hold its shape. These cheesecake cups store well in the refrigerator for up to 3 4 days when covered, making them an excellent make ahead dessert.
Variations to Try
These no bake cheesecake cups are incredibly versatile, allowing for many delicious variations to suit your taste. For a citrusy twist, increase the lemon zest to 2 teaspoons and consider adding a tablespoon of fresh lemon juice to the filling. You could also swap out lemon zest for lime zest and use a graham cracker crust mixed with a touch of lime for a refreshing key lime pie flavor.
If you’re a chocolate lover, try replacing half of the graham cracker crumbs with crushed Oreo cookies for the crust. Then, gently fold 2 tablespoons of unsweetened cocoa powder into the cream cheese mixture, or stir in a handful of mini chocolate chips. Another delightful option is to swirl in a few tablespoons of melted Nutella or a rich chocolate ganache into the filling before chilling, creating a beautiful marbled effect.
For a berry explosion, incorporate a half cup of finely diced fresh berries into the cheesecake mixture, or layer the filling with a homemade berry compote. You can also use a different cookie for the crust, like Biscoff cookies or shortbread, for unique flavor profiles. Don’t be afraid to experiment with different fruit purees or extracts to infuse new flavors into your creamy individual no bake cheesecake cups.
FAQ
Can I make these ahead of time?
Absolutely! These no bake cheesecake cups are a fantastic make ahead dessert. You can prepare them up to 2 3 days in advance and store them, covered, in the refrigerator. This allows the flavors to deepen and ensures they are perfectly set for serving.
Why is my cheesecake filling runny?
The most common reason for a runny filling is not whipping the heavy cream enough, or the cream cheese not being at room temperature. Ensure your heavy cream forms soft peaks and your cream cheese is fully softened for a smooth, stable mixture. If it’s still a bit soft, try chilling it for longer.
What can I use instead of heavy cream?
While heavy cream provides the best texture, if it’s unavailable, a pre sweetened whipped topping (like Cool Whip) can be used. Remember that these are often pre sweetened, so you’ll need to adjust the sugar content in the cream cheese mixture. Other dairy alternatives typically won’t whip to the same consistency required for this recipe.

No Bake Cheesecake Cups
Ingredients
Method
- In a medium bowl, combine the graham cracker crumbs with the melted butter and a pinch of salt if using unsalted butter. Stir until the crumbs are evenly moistened, resembling wet sand.
- Divide the crumb mixture evenly among about 8-10 individual serving cups or jars. Press the mixture firmly into the bottom of each cup to create a compact crust. Place these crusts in the refrigerator while you prepare the filling.
- In a large mixing bowl, beat the softened cream cheese with the granulated sugar using an electric mixer on medium speed. Continue mixing until the mixture is completely smooth and creamy, with no lumps remaining. Scrape down the sides of the bowl as needed.
- Stir in the vanilla extract and lemon zest (if using) into the cream cheese mixture. Mix until just combined, ensuring the flavors are well distributed.
- In a separate, chilled bowl, pour the very cold heavy cream. Using an electric mixer with a whisk attachment, beat the cream on high speed until soft peaks form. Be careful not to overbeat, as it can turn grainy.
- Gently fold half of the whipped cream into the cream cheese mixture using a rubber spatula. Use light, upward motions to maintain the airiness. Once mostly combined, fold in the remaining whipped cream until no white streaks are visible and the mixture is light and fluffy.
- Spoon or pipe the cheesecake filling evenly over the chilled crusts in each serving cup.
- Cover the no bake cheesecake cups with plastic wrap and refrigerate for at least 4 hours, or preferably overnight. This chilling time is essential for the cheesecake to firm up and develop its full flavor.
- Just before serving, top your chilled cheesecake cups with your favorite garnishes such as fresh berries, chocolate shavings, or a drizzle of caramel sauce.


