Table of Contents
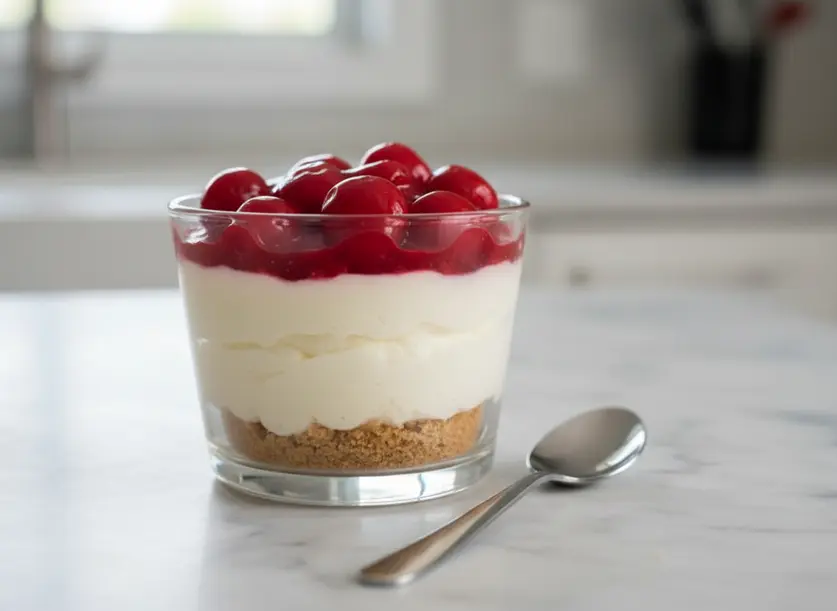
Do you crave the rich, creamy goodness of cheesecake but dread the baking process and the risk of cracks? These delightful no-bake cherry cheesecake cups are your culinary answer! You can whip up these individual desserts in no time, and they’re always a guaranteed crowd-pleaser. Featuring inviting layers of buttery graham cracker crust, a perfectly smooth and creamy cheesecake filling, and a luscious, sweet cherry topping, these cheesecake cups are the ideal treat for any occasion. Forget the traditional fuss of water baths, finicky oven temperatures, and worrying about cracked tops; this recipe is refreshingly foolproof. It delivers all the classic cheesecake flavor you adore with minimal effort, making it your go-to dessert when you need something quick, impressive, and utterly delicious.
What Makes This Dish Worth Making
I’ve been making these cherry cheesecake cups for years, and they are a consistent hit. The sheer ease of assembly is what truly sets this recipe apart. You never have to turn on your oven, which is a major advantage, especially during warm weather or when your oven is occupied with other dishes. These are also perfectly portion-controlled, eliminating the mess of slicing a large cheesecake and ensuring everyone gets an equal, elegant serving. Just hand out a cup and a spoon! The delightful interplay of textures—crunchy crust, smooth cream cheese filling, and vibrant cherry topping—is simply irresistible. This recipe shines for last-minute gatherings, casual potlucks, or simply as a comforting sweet treat for your family. Moreover, their distinct, visible layers make them look incredibly impressive, suggesting far more effort than you actually put in. They also travel exceptionally well, making them ideal for bringing to a friend’s dinner or a school event. Prepare for compliments and recipe requests every single time you serve these.
Ingredients You Will Need
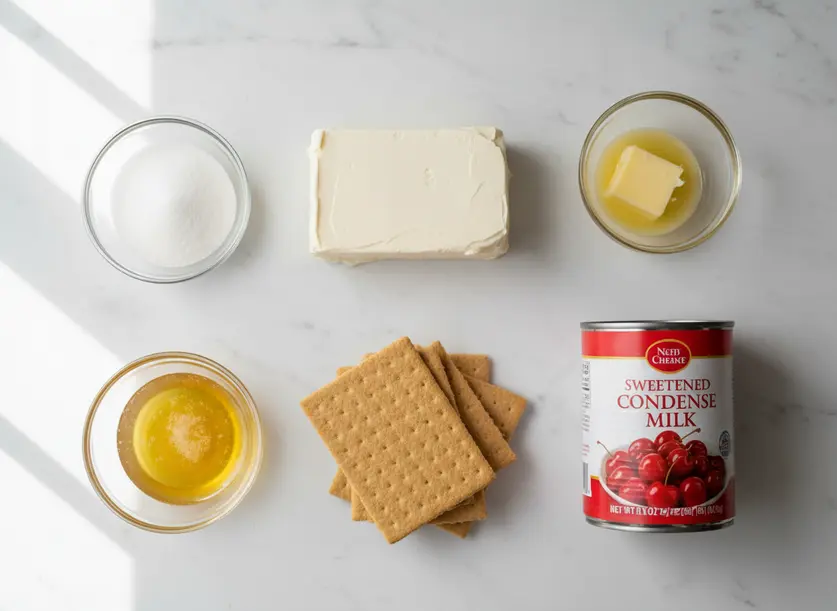
Gathering your ingredients for these cheesecake cups is straightforward. You’ll start with about 9 sheets of graham crackers for the crust. If you don’t have graham crackers, Nilla wafers or even crushed Oreos make fantastic substitutes. You’ll also need a quarter cup of granulated sugar and three tablespoons of melted butter to bind the crust. For the creamy filling, one 8-ounce block of softened cream cheese is essential. Make sure it’s at room temperature for a smooth mixture; otherwise, you might end up with lumps. A 14-ounce can of sweetened condensed milk adds the perfect sweetness and texture. Don’t confuse this with evaporated milk! Finally, a quarter cup of lemon juice brightens the flavor, which is roughly the juice from half a lemon. Bottled lemon juice works fine if you’re in a pinch. To finish, one 21-ounce can of cherry pie filling provides the classic fruit layer. Feel free to use homemade if you prefer, just ensure it’s cooled.
How to Make It Step by Step
Making these individual cheesecake cups is truly simple. Just follow these steps, and you’ll have a fantastic dessert ready in no time.
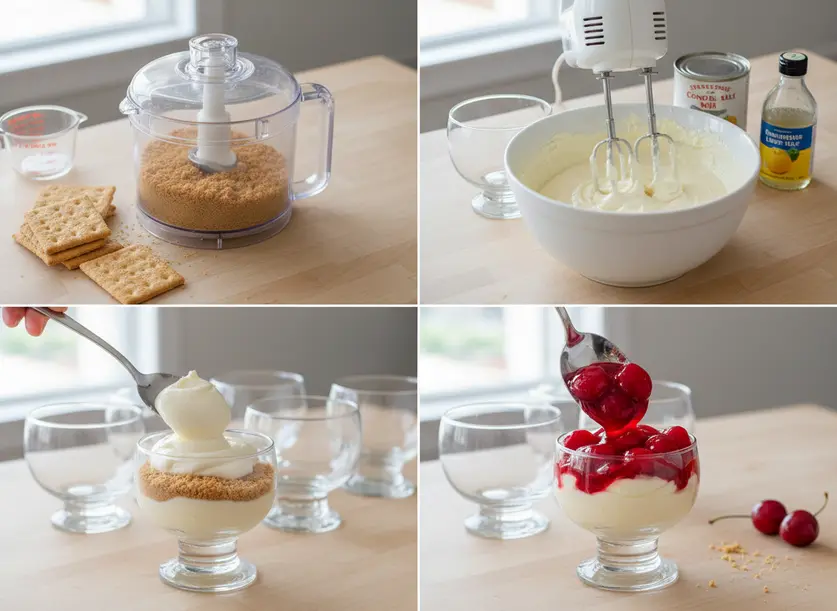
- First, prepare your graham cracker crust. In a food processor, combine the graham cracker sheets, granulated sugar, and melted butter.
- Pulse the mixture until it resembles wet sand. If you don’t have a food processor, you can crush the graham crackers by hand in a bag and then mix with sugar and butter in a bowl.
- Next, make the creamy cheesecake filling. In a large mixing bowl, combine the softened cream cheese, sweetened condensed milk, and lemon juice.
- Use an electric mixer to beat these ingredients until they are smooth and completely creamy. This ensures there are no lumps in your filling.
- Now it’s time for assembly. Grab your individual serving cups. Clear cups are best so you can see the pretty layers.
- Start by spooning a layer of the graham cracker crumbs into the bottom of each cup. Gently press it down with the back of a spoon.
- Follow this with a layer of the creamy cheesecake mixture.
- Then, add a layer of the cherry pie filling.
- Repeat these layers one more time: graham cracker crumbs, then cheesecake mixture, then cherry pie filling.
- Finish with a final sprinkle of graham cracker crumbs on top for extra texture and visual appeal.
- Cover the cups with plastic wrap and refrigerate for at least one hour. This chilling time helps the layers set and firm up before serving.
- Serve chilled and enjoy your perfectly layered, delicious cheesecake cups!
Tips for the Best Results
Getting your cheesecake cups just right is easy with a few simple tricks. These are my go-to pointers, refined over countless batches to ensure consistent success.
- Ensure Softened Cream Cheese: This is the most critical step for achieving a perfectly smooth filling without any unwanted lumps. Cold cream cheese will resist mixing and create a grainy texture. Make sure to take your cream cheese out of the fridge at least an hour, or even two, before you plan to start mixing. If you’re really pressed for time, you can gently microwave the unwrapped block for 10-15 seconds; just be careful not to melt it. As an alternative, using whipped cream cheese directly from a tub works wonderfully and speeds up the process even further.
- Use an Electric Mixer for Smoothness: While you can attempt to stir the filling by hand, an electric mixer truly makes a remarkable difference. It efficiently combines all the ingredients, incorporating more air into the mixture. This results in a lighter, fluffier, and most importantly, perfectly smooth cheesecake filling that has a luxurious mouthfeel. This step is non-negotiable for that ultimate creamy texture.
- Chill Thoroughly for Structure: Do not, I repeat, do not rush the chilling process. A minimum of one hour in the refrigerator is essential to allow all the cheesecake layers to set properly. This prevents a runny dessert and ensures the layers hold their shape. If you can manage to chill them for two to four hours, or even better, overnight, the flavors will have ample time to meld beautifully, and the texture will be absolutely ideal. Patience here really pays off.
- Smart Storage Solutions: Any leftover cheesecake cups are a delightful treat for days to come. They store exceptionally well in the refrigerator for up to 5 days. It’s crucial to cover them tightly with plastic wrap or place them in an airtight container. This prevents them from drying out and also protects them from absorbing any unwanted odors from other foods in your fridge. Making them ahead of time for parties or gatherings makes entertaining incredibly stress-free.
Variations to Try
Once you master the classic cherry cheesecake cups, the possibilities are endless. You can easily swap out ingredients to create exciting new flavors.
Instead of cherry pie filling, try other fruit fillings like blueberry, strawberry, or even apple pie filling. Peach pie filling with a hint of cinnamon in the crust is also incredible. For a chocolate twist, you could layer in chocolate fudge sauce or crushed chocolate cookies instead of fruit.
Experiment with different crusts. While graham crackers are classic, crushed Nilla wafers offer a vanilla hint. For a darker, richer crust, use crushed Oreo cookies. If you’re feeling fancy, gingersnap cookies make a spicy, sophisticated base, especially with a lemon or apple filling.
You can also add mix-ins to the cheesecake layer. Fold in some mini chocolate chips, a swirl of caramel, or a tablespoon of orange zest for an extra layer of flavor. A dollop of whipped cream on top just before serving is always a welcome addition too.
FAQ About Cheesecake Cups
Are cheesecake cups suitable for meal prep?
Yes, absolutely! These no-bake cheesecake cups are fantastic for meal prep. You can make them up to 3-4 days in advance and keep them covered in the refrigerator. They are perfect for grab-and-go desserts throughout the week.
Can I freeze cherry cheesecake cups?
While you can technically freeze them, the texture might change slightly upon thawing. The graham cracker crust can become a bit soggy, and the cream cheese filling might be less creamy. For the best quality, I recommend enjoying them fresh or just chilled from the refrigerator.
How do I prevent a runny cheesecake filling?
The key to a firm cheesecake filling is using softened cream cheese and ensuring your sweetened condensed milk is correctly measured. Also, lemon juice helps to set the cream cheese mixture. If it still seems a little soft after chilling, extend the refrigeration time. A thorough mixing also helps to emulsify the ingredients properly.