Table of Contents
Everyone loves cheesecake, but sometimes a whole cake is too much. That’s where perfect cheesecake cups come in! These delightful mini treats offer all the creamy indulgence of a classic cheesecake in a convenient, individual serving. They are simpler to make than a full-sized cake and absolutely ideal for gatherings, school lunches, or just satisfying a sweet craving without the commitment of a large dessert. The ease of preparation, combined with their adorable presentation, makes them a go-to for any occasion. Get ready to impress your friends and family with these irresistible cheesecake cups that are surprisingly easy to whip up in your own kitchen. You’ll wonder why you ever made a big cheesecake.
What Makes This Dish Worth Making
There’s something truly special about these mini cheesecake cups. First, they are incredibly easy to serve. No slicing, no messy plates, just grab and go. This makes them a dream for potlucks, parties, or even just a quick weeknight treat without any fuss. You don’t have to worry about everyone getting an even slice, and serving is a breeze.
Second, they offer built-in portion control. It’s easy to overindulge with a whole cheesecake, but these individual cups help you enjoy just the right amount of sweetness, making mindful eating simpler. Plus, they look absolutely adorable. A tray of these perfectly formed cheesecake cups is always a showstopper and guaranteed to make everyone smile. They travel well, too, so you can easily take them to events without damage. Forget fiddly water baths and cracking tops; these small wonders bake beautifully every time with minimal effort.
Ingredients You Will Need
For the crisp, buttery crust, you’ll need one and a half cups of finely crushed graham cracker crumbs, which is typically one sleeve of crackers. If graham crackers aren’t available, digestive biscuits or vanilla wafers work wonderfully as an alternative. You’ll also need about a quarter cup of melted unsalted butter to bind it all together, creating a sturdy base.
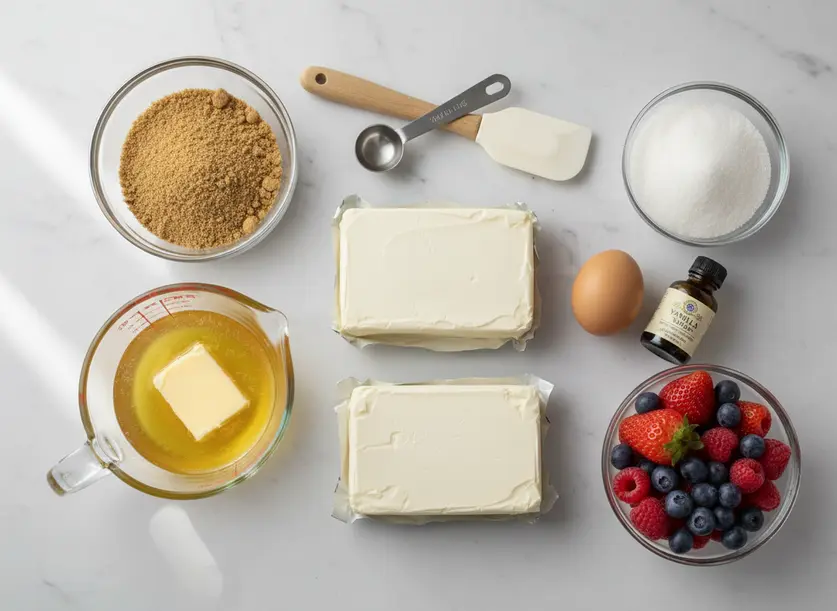
The star of the creamy filling is two 8-ounce blocks of full-fat cream cheese, softened completely to room temperature. Trust me, truly softened cream cheese is absolutely key for a smooth, lump-free filling. One large egg, also at room temperature, helps with structure and creates that classic cheesecake texture. Half a cup of granulated sugar and a teaspoon of pure vanilla extract round out the sweet, classic flavor profile. A tiny pinch of salt brightens everything up, enhancing the sweetness. Optional toppings are endless, but fresh berries or a drizzle of chocolate are always winners.
How to Make It Step by Step
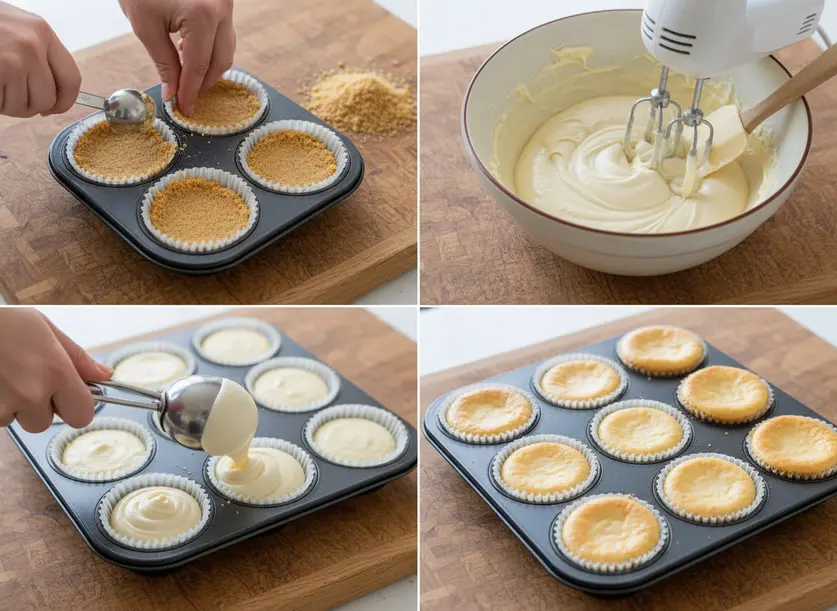
- Preheat your oven to 350°F (175°C). Line a standard 12-cup muffin tin with paper liners; foil liners also work well for easy removal.
- Crush graham crackers into very fine crumbs. You can use a food processor for speed, or place them in a Ziploc bag and crush with a rolling pin until uniformly fine.
- In a small bowl, combine the graham cracker crumbs and the melted unsalted butter. Mix thoroughly until all crumbs are moistened and resemble wet sand.
- Press about two tablespoons of the crumb mixture firmly into the bottom of each lined muffin cup. Use the back of a spoon, a small shot glass, or your fingers to compact it tightly.
- Bake the crusts for 5 minutes. This crucial step helps them set, prevents sogginess, and creates a more robust base. Remove from the oven and let cool slightly while you prepare the filling.
- While crusts cool, beat the softened cream cheese in a large bowl with an electric mixer on medium speed until it’s perfectly smooth and creamy. Remember to scrape down the sides of the bowl frequently.
- Add the granulated sugar to the cream cheese and continue beating on low speed until just combined. Be careful not to overmix at this stage.
- Stir in the pure vanilla extract and the pinch of salt. Ensure they are fully incorporated into the mixture.
- Crack the large egg into a separate small bowl, lightly whisk it, then add it to the cream cheese mixture. Beat on the lowest speed until just incorporated. Overmixing after adding the egg can lead to cracks in your finished cheesecakes.
- Divide the smooth cheesecake filling evenly among the 12 prepared crusts. Fill each cup about three quarters full; they will puff up slightly during baking.
- Bake for 18-22 minutes, or until the edges are set and lightly golden, but the centers still have a slight jiggle when gently shaken. This means they are perfectly cooked.
- Turn off the oven, crack the door slightly, and let the cheesecake cups cool in the oven for 15 minutes. This slow cooling process is vital for preventing cracks on the surface.
- Remove from the oven and transfer the muffin tin to a wire rack to cool completely at room temperature.
- Once cooled to room temperature, refrigerate the cheesecake cups for at least 4 hours, or preferably overnight, before serving. Chilling fully makes them firm and delicious.
Tips for the Best Results
Always use full-fat cream cheese for the richest, creamiest texture. Low-fat versions can result in a thinner, less satisfying texture that might not set as well, making your cheesecake cups less delightful. Ensure your cream cheese and egg are at true room temperature before mixing. Cold ingredients don’t blend smoothly, leading to frustrating lumps in your cheesecake filling and an inconsistent texture. Don’t overmix the batter, especially after adding the egg. Overmixing incorporates too much air, which can cause your cheesecakes to puff up excessively during baking and then collapse and crack as they cool, which is a common issue. Mix just until combined.
For storage, keep your finished cheesecake cups in an airtight container in the refrigerator for up to 5 days. They actually taste even better on day two! They also freeze beautifully for up to 2 months. To prevent freezer burn and maintain freshness, wrap each cup individually in plastic wrap, then place them in a freezer-safe container. Thaw them slowly in the fridge overnight before you plan to serve them for the best taste and texture.
Variations to Try
Feeling adventurous with your cheesecake cups? Try a chocolate crust by adding a tablespoon of unsweetened cocoa powder to your graham cracker mixture for a deeper flavor. You could also use crushed Oreo cookies for a truly decadent chocolate cheesecake cups base – no extra sugar needed for the crust then. For the filling, swirl in a tablespoon of fruit preserves, like sweet raspberry or tart cherry, after adding it to the crusts for a beautiful and delicious fruity twist. A half teaspoon of fresh lemon zest can also be added to the cream cheese mixture for a bright, tangy flavor that cuts through the richness.
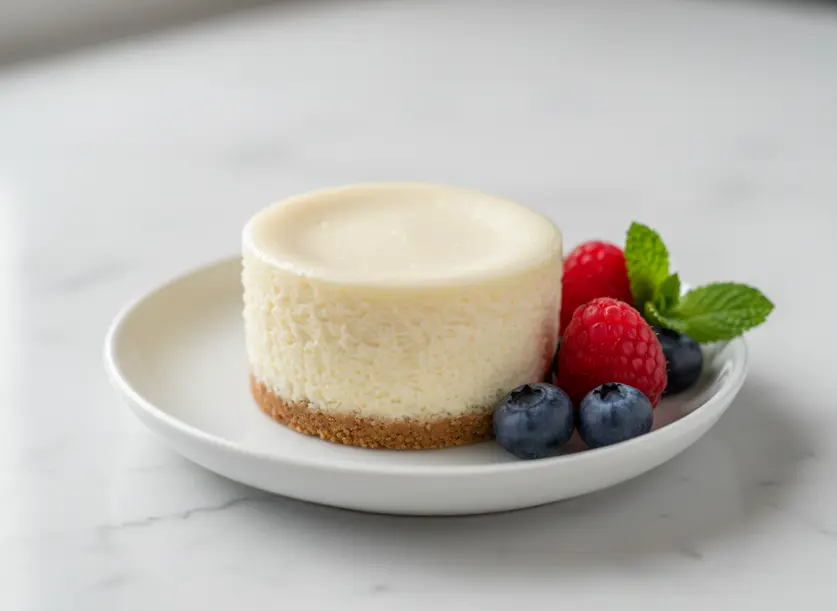
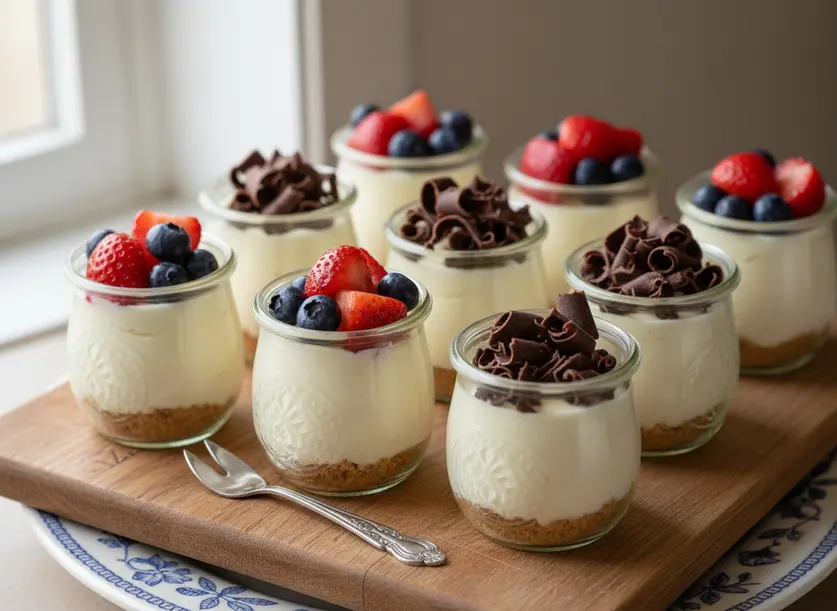
Top your baked cheesecake cups with a variety of garnishes: fresh berries, a dollop of homemade whipped cream, delicate chocolate shavings, or a decadent caramel drizzle. Experiment with different flavored extracts too; almond or orange extract can add a wonderfully unique flair to the filling. These small changes make a big difference in customizing your treats! Check out more cheesecake recipes at Allrecipes for inspiration, including these no bake cheesecake cups.
FAQ
Can I make cheesecake cups ahead of time?
Absolutely! These are a fantastic make-ahead dessert, perfect for busy schedules or entertaining. You can prepare them up to 2-3 days in advance and store them securely in an airtight container in the refrigerator. They actually taste even better after a day or two, as the flavors have more time to meld and deepen, providing a richer experience.
Why did my cheesecake cups crack?
Cracking in cheesecake cups usually happens from sudden temperature changes during baking or cooling, or from overmixing the batter. To prevent this, ensure all your ingredients are at room temperature before mixing. Don’t open the oven door too often during baking, and allow them to cool slowly in the oven with the door slightly ajar before transferring to a wire rack. Gently mixing the egg is also key.
Can I use different crusts for these cheesecake cups?
Yes, you absolutely can! The beauty of these individual cheesecake cups is their versatility. Besides graham crackers, crushed shortbread cookies, classic vanilla wafers, or even chocolate sandwich cookies (like Oreos) work wonderfully to create different flavor profiles for the base. When substituting, adjust the amount of melted butter as needed, aiming for a sand-like consistency that holds together when pressed firmly into the muffin liner.
Irresistible Cheesecake Cups
Ingredients
Method
- Preheat your oven to 350°F (175°C). Line a standard 12-cup muffin tin with paper or foil liners for easy removal.
- Crush graham crackers into very fine crumbs. Use a food processor or place them in a Ziploc bag and crush with a rolling pin until uniformly fine.
- In a small bowl, combine the graham cracker crumbs and the melted unsalted butter. Mix thoroughly until all crumbs are moistened and resemble wet sand.
- Press about two tablespoons of the crumb mixture firmly into the bottom of each lined muffin cup. Use the back of a spoon, a small shot glass, or your fingers to compact it tightly.
- Bake the crusts for 5 minutes. This crucial step helps them set and prevents sogginess. Remove from the oven and let cool slightly while you prepare the filling.
- While crusts cool, beat the softened cream cheese in a large bowl with an electric mixer on medium speed until it's perfectly smooth and creamy. Scrape down the sides of the bowl frequently.
- Add the granulated sugar to the cream cheese and continue beating on low speed until just combined. Be careful not to overmix at this stage.
- Stir in the pure vanilla extract and the pinch of salt. Ensure they are fully incorporated into the mixture.
- Crack the large egg into a separate small bowl, lightly whisk it, then add it to the cream cheese mixture. Beat on the lowest speed until just incorporated. Overmixing after adding the egg can lead to cracks.
- Divide the smooth cheesecake filling evenly among the 12 prepared crusts. Fill each cup about three-quarters full; they will puff up slightly during baking.
- Bake for 18-22 minutes, or until the edges are set and lightly golden, but the centers still have a slight jiggle when gently shaken. This means they are perfectly cooked.
- Turn off the oven, crack the door slightly, and let the cheesecake cups cool in the oven for 15 minutes. This slow cooling process is vital for preventing cracks on the surface.
- Remove from the oven and transfer the muffin tin to a wire rack to cool completely at room temperature.
- Once cooled to room temperature, refrigerate the cheesecake cups for at least 4 hours, or preferably overnight, before serving. Chilling fully makes them firm and delicious.


