1. Introduction
There is perhaps no duo in the culinary world more iconic than chocolate and peanut butter. It is a marriage of opposites: the deep, slightly bitter richness of cocoa meeting the salty, creamy, and earthiness of roasted peanuts. While this pairing excels in candies and cookies, it reaches its zenith in the form of a Chocolate Peanut Butter Swirl Brownie.
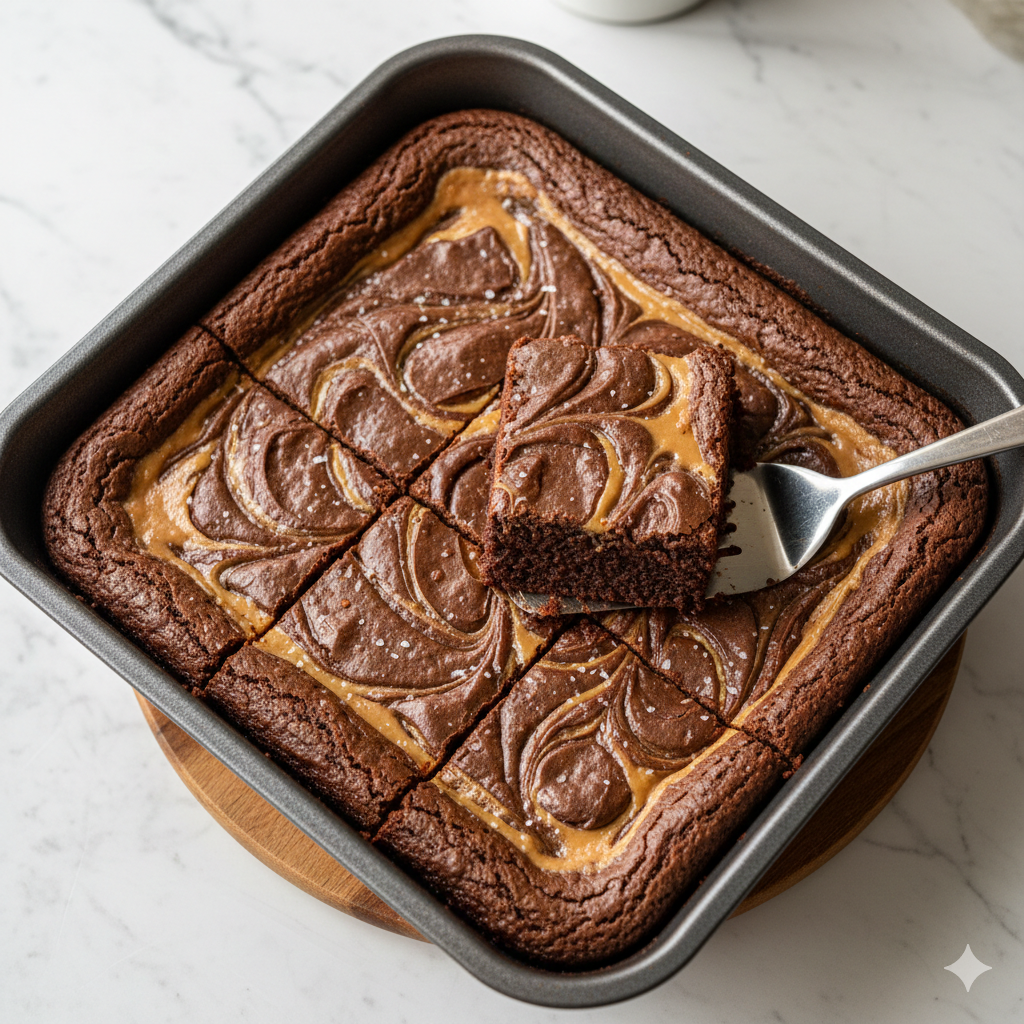
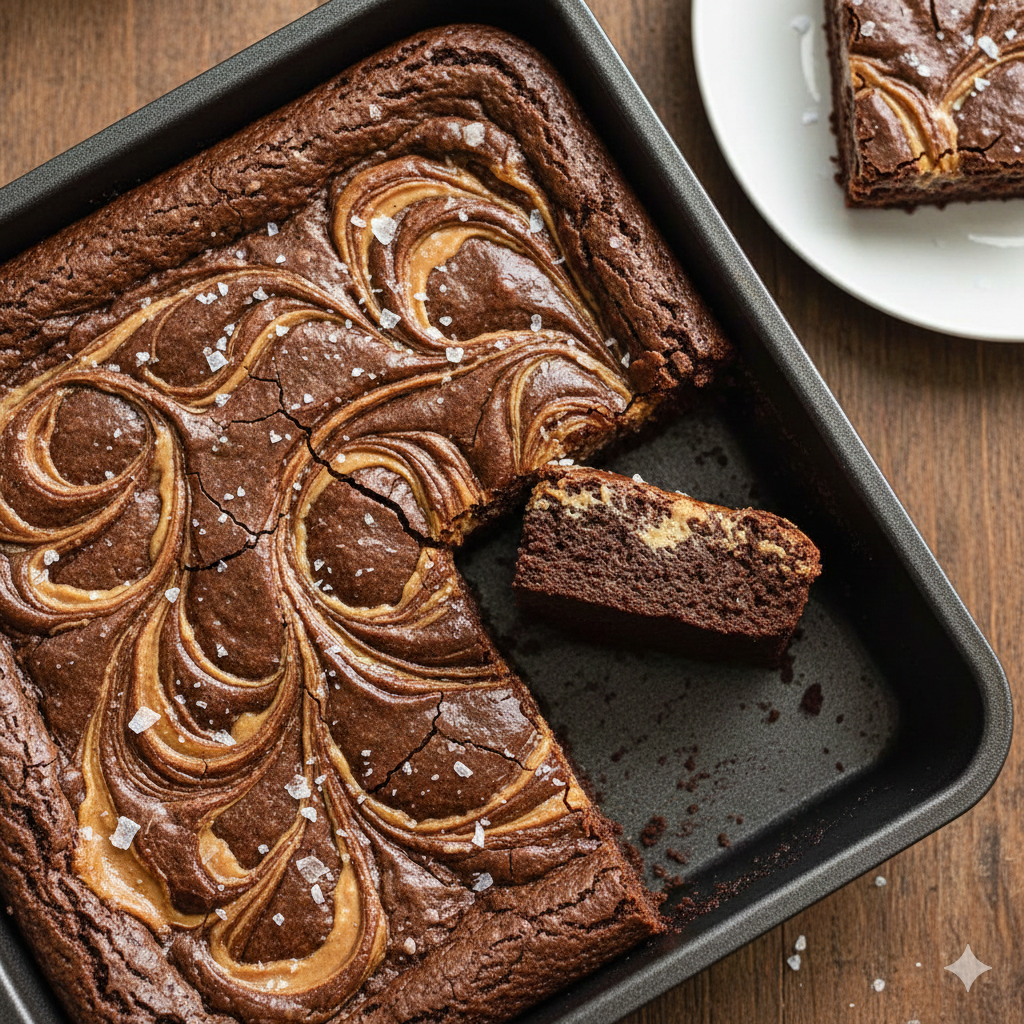
These aren’t your average box-mix squares. We are talking about a dense, “fudgy-not-cakey” foundation that boasts a crackly top, punctuated by thick, molten ribbons of salty peanut butter. This recipe stems from a desire to create a dessert that feels sophisticated enough for a dinner party but nostalgic enough for a Tuesday night snack. Whether you grew up eating peanut butter cups or discovered the magic of dark chocolate later in life, these brownies serve as a bridge between childhood comfort and gourmet indulgence.
The secret lies in the contrast. By using high-quality dark chocolate and a touch of sea salt, we elevate the brownie from a simple sweet treat to a complex flavor profile that satisfies every corner of the palate.
2. Recipe Overview
- Cuisine Type: American / Dessert
- Difficulty Level: Intermediate (Requires care with temperature and swirling technique)
- Prep Time: 20 minutes
- Cook Time: 30–35 minutes
- Total Time: 55 minutes (plus cooling time)
- Dietary Classifications: Vegetarian. (Can be modified for Gluten-Free or Dairy-Free).
3. Equipment and Tools
To achieve the perfect texture and that signature swirl, having the right gear is essential.
- Baking Pan: 8×8-inch (20×20 cm) square metal baking pan.
- Note: Metal conducts heat more evenly than glass for brownies, helping achieve those crisp edges.
- Mixing Bowls: One large heat-proof bowl for melting chocolate and one medium bowl for the peanut butter mixture.
- Saucepan: For a double boiler (bain-marie) setup.
- Spatulas: Silicone rubber spatulas for folding ingredients without deflating the batter.
- Whisk: A sturdy balloon whisk for aerating the eggs.
- Measuring Tools: A digital kitchen scale is highly recommended for precision, alongside standard US cups and spoons.
- Parchment Paper: Essential for “sling” construction to lift brownies out easily.
- Skewer or Butter Knife: For creating the aesthetic swirl pattern.
4. Serving Suggestions
These brownies are rich enough to stand alone, but a little styling goes a long way.
- Plating: Serve slightly warm on a white ceramic plate to make the dark chocolate pop.
- Garnish: A light dusting of flaky sea salt (like Maldon) or a few crushed roasted peanuts adds texture.
- Side Dishes: A side of tart raspberry coulis cuts through the richness beautifully.
- Beverage Pairings:
- Coffee: A bold Espresso or a creamy Flat White.
- Milk: A classic glass of ice-cold whole milk.
- Wine: A fortified wine like a Ruby Port or a sweet Sherry.

5. Nutritional Information
(Values are per serving, based on 16 squares)
| Nutrient | Amount |
| Calories | 285 kcal |
| Total Fat | 18g |
| Saturated Fat | 9g |
| Carbohydrates | 32g |
| Fiber | 2g |
| Protein | 5g |
| Sugar | 22g |
Health Note: While an indulgence, the use of dark chocolate provides antioxidants (flavonoids), and peanut butter contributes healthy monounsaturated fats and protein.
6. Storage and Reheating
To maintain that fudgy interior, follow these storage guidelines:
- Room Temperature: Store in an airtight container for up to 4 days.
- Refrigeration: Brownies stay fresh for up to 1 week in the fridge. This actually makes them even denser and “fudgier.”
- Freezing: Wrap individual squares in plastic wrap, then place in a freezer bag. They last up to 3 months.
- Reheating: To regain the “molten” feel, microwave a single square for 10–15 seconds. Avoid overheating, as the chocolate can become oily.
7. Expert Tips and Variations
Professional Tips
- The “Sling” Method: Always line your pan with parchment paper leaving an overhang on two sides. This allows you to lift the entire block out once cooled, ensuring clean cuts.
- Don’t Overmix: Once the flour is added, fold gently. Overworking the gluten will turn your fudgy brownie into a tough, bread-like cake.
- The Temperature Factor: Ensure your eggs are at room temperature. Cold eggs can cause the melted chocolate to seize.
Creative Variations
- The Crunch Factor: Add $1/2$ cup of chopped pretzels to the batter for a salty crunch.
- Double Chocolate: Fold in $1/2$ cup of white chocolate chips for a “triple threat” visual.
- Nut-Free: Swap peanut butter for sunflower seed butter or tahini for a sophisticated, earthy twist.
8. Ingredients Section
The Chocolate Base
- Unsalted Butter: 170g ($3/4$ cup) – High-quality European style preferred.
- Dark Chocolate (60-70% cocoa): 200g (approx. 1 cup chopped).
- Granulated Sugar: 200g (1 cup).
- Light Brown Sugar: 50g ($1/4$ cup) – Packed, for moisture and chew.
- Large Eggs: 3 units (Room temperature).
- Vanilla Extract: 10ml (2 tsp).
- All-Purpose Flour: 95g ($3/4$ cup).
- Unsweetened Cocoa Powder: 30g ($1/4$ cup) – Dutch-processed for deep color.
- Sea Salt: $1/2$ tsp.
The Peanut Butter Swirl
- Creamy Peanut Butter: 125g ($1/2$ cup) – Avoid “natural” oily versions for better structural stability.
- Powdered Sugar: 30g ($1/4$ cup).
- Melted Butter: 1 tbsp.
9. Step-by-Step Instructions
- Preparation: Preheat your oven to 175°C (350°F). Grease your 8×8-inch pan and line with parchment paper.
- Melt Chocolate/Butter: Using a double boiler, melt the 200g of dark chocolate and 170g of butter together. Stir until glossy and smooth. Set aside to cool slightly.
- Whisk Sugars and Eggs: In a large bowl, whisk the granulated sugar, brown sugar, and eggs vigorously for 2–3 minutes. You are looking for the “ribbon stage”—where the mixture is pale and thick.
- Combine: Gently pour the chocolate-butter mixture into the egg mixture while whisking constantly. Add the vanilla extract.
- Dry Ingredients: Sift in the flour, cocoa powder, and salt. Use a spatula to fold the dry ingredients into the wet until just combined. No streaks of flour should remain.
- Prep the Swirl: In a small bowl, mix the peanut butter, powdered sugar, and 1 tbsp melted butter until smooth. If it’s too thick, microwave for 10 seconds.
- Layering: Pour the brownie batter into the prepared pan. Smooth the top. Drop dollops of the peanut butter mixture over the surface.
- The Swirl: Using a skewer or knife, pull the peanut butter through the chocolate batter in a “figure-8” motion. Do not over-swirl, or the colors will muddy together.
- Bake: Bake for 30–35 minutes.
- Visual Cue: The edges should be set, but the center should still have a very slight wobble. A toothpick inserted should come out with a few moist crumbs (not wet batter).
- Cooling: This is the hardest part—let them cool completely in the pan for at least 1 hour before slicing. This sets the fudge structure.
10. Frequently Asked Questions (FAQ)
Q: Can I use “Natural” peanut butter?
A: It is risky. Natural peanut butter (the kind you have to stir) often separates when baked, which can make your swirls oily. Conventional creamy peanut butter works best for a clean look.
Q: Why didn’t I get a crackly top?
A: The crackly top comes from dissolving the sugar properly in the eggs. Make sure to whisk your eggs and sugar until they are pale and fluffy before adding the chocolate.
Q: My brownies are too dry. What happened?
A: You likely overbaked them. Brownies continue to cook in the hot pan after being removed from the oven. Pull them out when the center is still slightly soft.
Q: Can I make these gluten-free?
A: Yes! Substitute the all-purpose flour with a 1:1 gluten-free baking flour blend. Since this recipe relies on chocolate and eggs for structure rather than gluten, the results are excellent.
Q: How do I get perfectly clean cuts?
A: Chill the brownies in the fridge for an hour after they reach room temperature. Use a large chef’s knife dipped in hot water (and wiped dry) between every single cut.